


Some people look at scopes as just a fancy accessory that improves performance but one that isn’t entirely necessary. After all, you should learn to shoot with iron sights before you graduate to an optic, right? That’s not entirely true.
Scopes are a game-changer for any type of shooting. Whether you’re hunting, target shooting, competing, or just plinking at the range, scopes are guaranteed to improve your accuracy. If you’re doing any sort of long-range shooting, a scope is an absolutely essential piece of equipment.
However, you can’t just slap a scope on a rifle and call it a day. Your gun is a precision tool, and much like the equipment you used back in your high school science lab, you need to calibrate it to make it work right. It doesn’t matter if you have the fanciest, most expensive, cutting-edge scope on the market — if you don’t sight it in properly, you might as well be shooting with your eyes closed (don’t do that).
If you’ve never used one before, here’s our beginner’s guide on how to sight in a rifle scope.
Understanding the Basics of a Rifle Scope
First, let’s be clear about what exactly qualifies as a rifle scope.
Gunsmith Morgan James invented the first rifle scopes in Utica, NY, between 1835 and 1840. The invention quickly caught on and became standard issue to American sharpshooters during the Civil War. Militaries, police, and civilians have all used scopes for various applications ever since.
In essence, the purpose of a scope is to increase your accuracy by magnifying a shooter’s sight picture. If you really want to reach out and touch a target, a scope is the only way to do so.
Types of Scopes
There are essentially three categories of scopes (or optics) to choose from:
- Low Power Variable Optics (LPVOs): LPVOs are ideal for shooting short- to mid-range. They generally zoom between 1x and 8x.
- Higher Powered Scopes: These scopes mostly benefit hunting rifles or precision shooters. They can often go up to 25x magnification.
- Red Dots and Prisms: These are low-powered, fixed-magnification optics that usually magnify between 1x and 3x. They are often used for close-range shooting.
Source: https://shootersbestfriend.wordpress.com/2013/11/22/parts-of-a-rifle-scope/
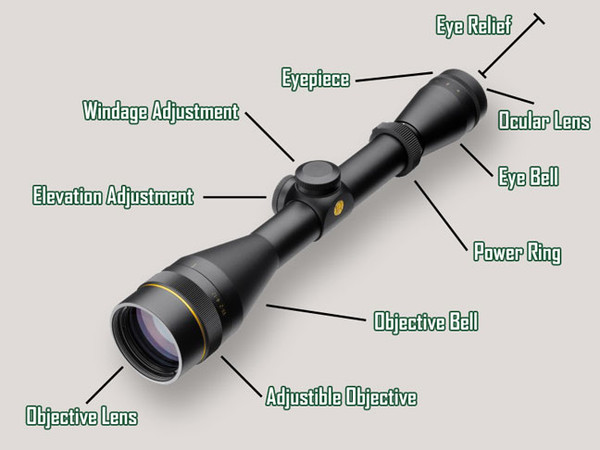
Parts of a Rifle Scope
The general design of a scope is simple enough: a hollow cylinder with a series of magnifying lenses inside. Regardless of the type of scope you use, they’re made with the same core components:
- Objective Lens: This is the closest lens to the target. It absorbs light bouncing directly off the image of what the shooter is looking at.
- Ocular Lens: The closest lens to the shooter. This directs the image into the shooter’s eye.
- Windage Adjustment: Allows the shooter to adjust their aim to the left or right.
- Elevation Adjustment: Allows the shooter to adjust their aim up or down.
- Scope Tube: This is where you attach scope rings to connect the scope to the rifle. It directs the image from the objective lens towards the shooter. Standard measurements include 30mm, 34mm, and 1 inch.
- Reticle: To the uninitiated, the terms “reticle” and “crosshairs” are interchangeable. There’s actually a difference, though. A reticle will always contain a crosshair, but it will often contain other visual measurement aids to compensate for factors like gravity and wind. A crosshair is just the term for the two perpendicular lines that intersect in the middle of the scope’s sight picture and indicates your point of aim.
- Power Ring: Rotate this part of the scope (usually near the ocular lens) to increase or decrease magnification.
Some optics may also include illumination controls to light up the reticle in dark environments, but this isn’t universal.
How to Mount a Rifle Scope
Before you can actually sight in your scope, you need to mount it to your rifle. Here’s how to do that:
Mounting Different Types of Scopes
Mounting a scope can be done one of two ways, depending on the type of optic you’re using.
- Mounting Red Dots and Prisms: For these, you’ll likely need a mount specifically for your optic’s footprint. You’ll attach your optic to one end of the mount, then attach the other end to your rifle (usually via a Picatinny rail or M-LOK system, but not always).
- Mounting LPVOs and Other Types of Scopes: You’ll need to pick up some scope mounting rings or a cantilever mount to mount these types of scopes with proper eye relief and height (in some cases you may also need a base, depending on the model). Ring diameters must match your scope’s tube diameter: either 30mm, 34mm, or 1 inch.
Where to Mount Your Scope
Before you can mount your scope on your rifle, you’ll need to decide exactly where you want to mount it. This may sound simple, but there are actually several factors you’ll need to consider.
- Eye Box: This area of the optic allows you to see your full sight picture. You want to align a scope so that the eye box fully fills the eyepiece — no black circle around it. The bigger the eye box, the easier it will be to aim.
- Eye Relief: This refers to the distance between your eye and the eyepiece that offers the best picture clarity. If a scope is mounted further than your optic’s max eye relief, the picture will be distorted and fuzzy.
- Leveling: If your scope isn’t level, you’re going to be shooting either high or low of your target. Fortunately, to make sure your scope is level, all you need to do is use a level (like one from the hardware store) when mounting it.
- Eyepiece Focus: You’ll want to adjust your eyepiece focus after you mount your scope. Your eyepiece focus changes the “diopter” or your scope. This will differ from person to person.
- Recoil: News flash: when you shoot a gun, it kicks back. When considering scope placement, you’ll want to make sure you’re leaving enough room between your eye and the scope so that the recoil doesn’t cause the optic to kick back and hit you in the face (a.k.a “scope bite”). This is probably one of the most overlooked factors in rifle placement for newer shooters simply because they don’t have prior experience shooting with a scope.
Attaching a Scope to a Rifle
Attaching a scope to a rifle is a relatively simple process, but it requires a few specific steps:
- First things first: safety is paramount when working with firearms. Ensure your gun isn’t loaded by removing the magazine (if it has one) and racking the action twice. Then, visually confirm that there is no round in the chamber. You should also put a finger in the chamber to physically feel that it’s empty.
- Put your rifle in a vise. Then, attach the bottom half of the scope rings to the rifle. Many rifles do this via a Picatinny rail, but not all.
- Next, place the optic in the lower half of the rings.
- Take a peek through the optic to ensure that your eye box and eye relief look good. Then, place a level on top of the scope to ensure it’s not forward or backwards.
- Once everything looks good, attach the top half of the rings and tighten them to hold the scope in place. The manuals for most scopes/rings will tell you how much force you need to ensure it’s attached to your rifle properly.
- Use a torque wrench to tighten your scope rings perfectly. You can find one at your local hardware store — just make sure it measures in inch/pounds (not foot/pounds). Then, check the scope, base, and the ring’s screws to see if they have a specific inch/pound range they need to be tightened to. If you don’t tighten them enough, your scope may go flying after you start shooting.
Should You Use Loctite on a Scope?
As an amateur gunsmith researching this very subject, you might find a few people online claiming to use Loctite adhesive on their scope rings to keep the optic secure. Whether or not this is a good practice is debatable, and it depends on who you ask. Some optic manufacturers like Vortex recommend against it. When in doubt, look up what your optic and ring manufacturers recommend for your specific scope model.
Bore Sighting – The Initial Alignment
Although it’s not strictly necessary, you’ll want to use a bore sight to initially align your scope. A bore sight tool is a great way to save time, ammo, and a big headache when sighting in your optic.
Bore sight tools come in several configurations. Many act as a gadget that attaches to the muzzle of your gun with a magnet — then, it shoots a laser out to determine your general point of aim. Other models go inside the barrel for increased precision. Still others project light, visible targets to get you close to accuracy, even when boresighting in short distances.
Before you start sighting in your scope, make sure your optic is level to the receive to present shot deviation at a distance. Then, you’ll need to make a decision. What distance do you want it sighted to? Most shooters sight in their rifles at 100 yards, although you may want to go further out if you’re planning on using this gun for hunting. For example, you might sight your rifle for 300 yards so you don’t need to account for bullet drop at that distance, making it easier to ethically kill your target in one shot while still remaining concealed from a distance.
When sighting in a rifle, make sure you’re doing it at “bench rest.” This means you’re sitting in a chair with the rifle on a table, resting on a sandbag or stand. Don’t try to sight a rifle “offhand” (standing). Your groupings will not accurately depict the rifle’s accuracy, and it’ll be impossible to actually sight your scope in.
Once you use a bore sight to ensure your rifle will be shooting in the same zip code as your scope’s sight picture, you’re ready to move on to the next steps.
How to Sight In Your Rifle Scope in 5 Easy Steps
We’ll break down how to sight in your rifle scope in 5 easy steps below. While every rifle and scope is somewhat different, these steps should help you get your scope sighted accurately no matter what model you’re using.
Step 1: Properly Focusing the Reticle
Your first order of business is to get your reticle in focus. No one likes a fuzzy reticle – you want it to be sharp and distinguished from the image you’re looking at. Use the eyepiece focus ring to adjust the diopter settings until your reticle is crisp and clean in your sight picture.
Step 2: Setting Your MOA (Minute of Angle)
Minute of Angle (MOA) is a concept that seems complicated on the surface. But once you understand it, you’ll realize it’s not that difficult. Minute of angle essentially creates an angle within your scope to compensate for long-range shooting. One MOA is essentially 1 inch at 100 yards. However, it increases with distance. At 200 yards, it’s about 2 inches, 3 inches at 300 yards, and so on.
Here’s how it works:
- If your gun is shooting 1 inch low at 100 yards, you’ll need to adjust it up 1 MOA.
- If you’re shooting 4 inches low at 400 yards, you still only need to adjust 1 MOA.
- If you were hitting 8 inches low at 400 yards, you’d want to adjust 2 MOA.
Step 3: Parallax Adjustment
You’ll also want to ensure that the parallax on your optic is correct. If you see your reticle “swimming” around as you move your eye or adjust magnification, it means your parallax is not dialed in.
This can be a problem. If your scope’s parallax is out of whack, you won’t be able to hit what you’re aiming at. To fix this problem, adjust the parallax knob until your reticle stays stationary even as you move your eye or increase/decrease zoom. Once you do, you’re ready to move on to the next step.
Step 4: Fire First Shots
At long last, we’ve finally reached the most exciting part of sighting in your rifle scope: shooting your first group!
To make sure your bore and optic are correctly aligned, it takes some good old-fashioned trial and error. First, find a target that’s divided into one-inch squares. The squares are necessary, since you need them to measure your accuracy.
Next, fire a group. When sighting in a rifle, you generally want to use 3-shot or 5-shot groups.
Step 5: Make Necessary Adjustments and Repeat
Finally, you’ll want to adjust your scope so it’s just right. Don’t skip the fine tuning step — you’ll thank yourself later.
- Check out where your grouping ended up. Look at your point of aim (where your crosshairs were) vs. point of impact (where your shots landed). This will tell you how the end of the scope aligns with the rifle barrel. This is where the one inch squares on your target will be useful.
- Count how many inches your group missed.
- Use your elevation and windage knobs on your scope turrets to move your crosshairs so that it’s closer to the target you’re trying to hit. Your manual will tell you how many clicks clockwise or counterclockwise you’ll need to get your desired elevation and windage adjustments.
- Fire another 3-round (or 5-round) group. Assess your grouping and repeat the process until you’re nailing bullseyes. If you’re shooting a red dot optic at short range, you generally won’t need to worry about changing MOA. If you’re shooting at a longer range than 100 yards, you may also need to make some MOA adjustments, too.
Final Thoughts
Regardless of what you’re trying to accomplish with your firearm, that fancy scope you just bought isn’t going to help you do it unless you sight it in.
Using the simple process we’ve outlined here, you can get your scope sighted in just a few minutes. What’s more, once you start nailing bullseyes, your confidence and success as a shooter will begin to increase too.
However, accuracy has to do with more than just your scope — or even your rifle. Ammunition, accessories, and basic firearms training all play a huge part in your accuracy with your firearm. Fortunately, ProArmory is here to help you get all you need to be the best marksman on the range. Check out our selection of rifle ammunition and premium optics online. We ship all your orders straight to your door for the lowest price possible.
Want more training about how to maintain and use your firearm? Our online firearms training courses will help you improve your knowledge of fundamentals, like how to sight in a scope, how to clean your rifle, and much more. Sign up for our email newsletter to receive notifications when training officially launches.
Best Ammo Deals, Training, & Accessories
Subscribe to ProArmory sales and deals email.


")