


Most shooters have heard the term “spray and pray.” It’s an approach that involves pointing the muzzle of your firearm at your target and pulling the trigger multiple times, hoping you might hit it. But spraying and praying is mainly for action movie stars and gamers. In a real-world scenario, accuracy is key.
Accurate, aimed fire is far more effective (and far less expensive) than dumping a mag as fast as you can in the target’s general direction. However, accuracy with any firearm requires training in order to the maintain muscle memory used to land more rounds on target consistently.
Whether it’s a handgun, a rifle, or a shotgun, accurate shooting requires the mastery of seven basic aspects:
- Proper stance
- Shooting with one or two eyes open
- Proper sight picture
- Proper breathing
- Pressing through the trigger
- Ignoring the muzzle report
- Recoil management
Mastering these seven aspects does not come naturally to most shooters. You’ll need to practice regularly to gain and maintain these skills. Let’s look at how you can improve accuracy in these areas by honing in on the proper technique.
1. Improving Your Stance
The first step to improving your shooting accuracy is learning how to hold a firearm using the proper stance. Guns are powerful objects. Even something as mild as a .22 can be hard to shoot with a poor stance. When the gun recoils, your stability starts with the position of your body. There are four basic stances for shooting rifles or shotguns and three stances for handguns.
Rifle and Shotgun Stances
There are four basic positions for shooting a rifle or shotgun:
- Standing - Although shooting a rifle or shotgun while standing presents the least stable (and the least accurate) stance, it is one of the most common. First, position your feet at a 90-degree angle to your target, roughly shoulder width apart. Next, place the butt of the rifle or shotgun tightly against your shoulder. Rest your cheek on the comb of the butt stock as you peer down the receiver and barrel while aligning the front and rear sights. It’s worth noting that this stance does place your body at an unnatural angle, so it will inevitably cause your sight to waver while pointing at the target. To steady the sight on the target, inhale and exhale deeply, then inhale only half of a breath and hold it. Then, gently press through the trigger as the sight crosses the target.
- Kneeling - While kneeling gives you a bit more stability than standing, it still puts your body in an awkward position. To shoot in this position, kneel with one knee on the ground and the other one upright while tucking your foot underneath your upright hip to provide stability. Next, place the elbow of the arm holding the forearm of the rifle or shotgun on the upright knee for support so you can steady the sights while aiming. Then, press through the trigger when the front sight crosses the target.
- Sitting - Sitting provides far greater accuracy than standing or kneeling. To shoot in this position, sit down on the ground with your legs crossed in front of you. After mounting your rifle to your shoulder, lean forward and place both elbows on your knees while aligning the sights. This effectively provides a stable tripod to steady your sights on the target. Press through the trigger as the front sight crosses the target.
- Prone - Shooting prone provides the greatest accuracy of all rifle and shotgun stances. However, it is also a difficult stance to get into. First, you must lay down on your stomach. Then, you’ll need to position both elbows on the ground in front of you while mounting your firearm against your shoulder and aligning the sights. Once the front sights are properly aligned, gently press through the trigger as the front sight crosses the target.
Handgun Stances
There are three proper stances for shooting a handgun:
- The Weaver Stance - The Weaver Stance was developed in the late 1950s by Los Angeles Deputy Sheriff Jack Weaver for use in Freestyle Competition Shooting. Today, it is the single most popular pistol shooting stance among male shooters. To use this stance, position your feet so that you are facing at an angle slightly less than 90 degrees away from the target with your knees slightly bent and your hand holding the firearm closest to the target. Next, grasp the firearm with both hands and extend it toward the target with both elbows slightly bent.
- The Modified Weaver Stance - The Modified Weaver Stance is the same as the Weaver Stance with one slight difference. To use this stance, start by getting into the traditional Weaver Stance. Then, ensure your arm holding the firearm is fully extended and your elbow locked. Leave the other elbow slightly bent. This is mainly a matter of preference, comfort, and stability and will vary with each shooter.
- Isosceles Stance - This stance is generally the least popular among male shooters but tends to be popular among female shooters. To use the Isosceles Stance, position your feet so that you are parallel to the target and facing it directly. Then, grasp the firearm with both hands, and raise it to point at the target with both elbows fully extended and locked. Finally, lean slightly forward with your knees bent to counterbalance the weight and recoil of the firearm.
2. Open Your Eye(s)
While most firearms instructors insist on a one-size-fits-all approach, requiring shooters to learn to shoot with both eyes open, this doesn’t work for everyone. This is largely due to a factor called eye dominance. Some shooters are right-eye dominant, while others are left-eye dominant. Others are co-dominant (equally dominant in both eyes).
If you’re right-eye dominant, your right eye has greater visual acuity than your left eye. The opposite is true of left-eye dominant shooters. Consequently, some people shoot more accurately when they squint or close their non-dominant eye and use only the dominant eye to focus on the front sight.
Many shooters are actually cross-eye dominant, meaning their dominant eye is opposite of their dominant hand (i.e. a right-handed shooter who is left-eye dominant, or vice versa). In this situation, you’ll need to make some slight adjustments to the presentation of your firearm to shoot comfortably and accurately. For instance, if you are shooting a pistol, you might need to move it slightly to one side to line up with your dominant eye (while still keeping it level, of course). When shooting a rifle, you might need to turn your head slightly to the right or left to coordinate the sights with your dominant eye.
Precision vs. Combat Shooting
It’s also important to note that there is a significant difference between precision shooting and combat shooting. When precision shooting, the goal is to hit a precise point on the target — a relatively simple task when your life is not in danger. In a training or range shooting scenario, you usually have plenty of time to close one eye while acquiring a proper sight picture.
However, in a self-defense situation, closing one eye limits your peripheral vision. This may cause you to miss the movement of any additional assailants that approach you on the closed eye side. Therefore, when shooting in self defense, it is often more beneficial to keep both eyes open and accept the slightly less accurate shot placement. It’s wise to experiment with shooting with either eye closed and with both eyes open to determine which method works best for you.
3. How to Acquire a Sight Picture
Learning how to acquire a proper sight picture is paramount to better accuracy. In fact, the single most common mistake among new shooters is focusing on the target rather than the firearm’s front sight.
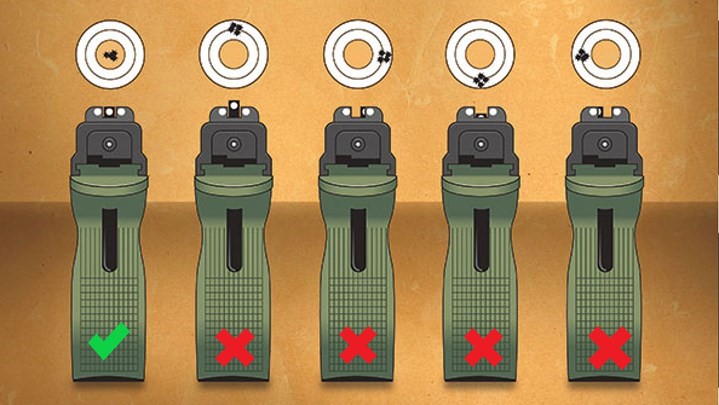
Examples of proper and improper sight picture. Notice the alignment of the front and rear sights in the far left example. Source: https://www.nrawomen.com/content/sight-alignment-and-sight-picture-means-hitting-your-target/
Both rifles and handguns are often aimed by aligning the front and rear sights. However, shotguns are often pointed rather than aimed — since they are typically used for shooting moving targets. Most shotguns have a rudimentary front sight in the form of a brass bead, but some self-defense shotguns come equipped with both front and rear sights. Because this setup is more common among most firearms, learning to acquire the proper sight picture using a firearm with both front and rear sights is the best approach.
Once you have chosen your stance and aimed at your target, focus your eye(s) on the front sight. It’s important not to focus on the target itself. Instead, focus entirely on the front sight and allow your peripheral vision to align it with the rear sight. Make sure the front sight is aligned with the middle of the rear sight and is even with the top. Then, with your focus remaining on the front sight, inhale and exhale completely. Then, inhale half a breath and hold it. Then, gently press through the trigger while holding the target's front sight.
4. Breathe Deeply
When precision shooting, how you breathe also affects your accuracy. This is why learning to breathe properly is so important. Because inhaling and exhaling causes your chest to expand and contract, it also causes your arms to move. The more heavily you breathe, the more exaggerated that movement will be. Therefore, to shoot more accurately, you will need to control your breathing.
When you are breathing harder due to walking or running, the best way to make the most accurate shot is to first stop and assume your chosen stance. Then, take one or more deep breaths, inhale as deeply as possible and exhale completely in a slow, controlled manner. Finally, inhale only a half a breath and hold it while you acquire your sight picture and make the shot.
5. Press the Trigger (Don’t Pull It)
Most shooters tend to rapidly pull the trigger. However, this can inadvertently cause you to misalign the sights. When you pull the trigger suddenly (instead of pressing through it gently), you move the firearm in one direction or another. That slight movement makes a big difference in your bullet’s trajectory.
If this is a consistent problem for you, it might be because you are anticipating the shot and struggling to keep a steady sight picture. You might try to pull the trigger fast before your arm moves too much. That’s understandable, but it’s not the best solution. The key is not to pull the trigger too quickly, but to control your breathing better to steady your aim. This way, you have more time to press through the trigger while the firearm is aimed properly.
But even with proper breathing, many shooters find it exceedingly difficult to hold the front sight precisely on the target even for a moment. In this case, you can learn to press the trigger as the front sight crosses the target rather than attempting to hold the front sight absolutely still.
Overall, shooters must learn to gently press through the trigger rather than jerking it so that the sights will stay in alignment until the projectile has left the muzzle.
6. Ignore the Muzzle Report
As soon as you pull the trigger, you will instantly hear the loud muzzle report caused by the projectile exiting the firearm. This causes many inexperienced shooters to flinch as they squeeze the trigger. This, in turn, causes the shooter to misalign the sights immediately before firing the shot and miss the target. Bummer.
In order to shoot more accurately, you must learn to ignore the muzzle report entirely. The best solution for this is to wear a pair of high-quality ear muffs that are specifically designed to dampen or even cancel the sound of a muzzle report. Ear protection allows you to concentrate on the other basics of shooting accuracy, while learning to ignore the muzzle report.
7. Recoil Management Tips
In addition to the muzzle report, you will immediately feel the firearm recoil after pulling the trigger. This too can cause you to flinch (although it is less often the culprit than hearing the muzzle report). Unfortunately, there is no simple fix for this problem other than starting with a small caliber firearm that produces very little recoil. You can work your way up to larger calibers as you get used to the feeling. Otherwise, you can shoot a more powerful firearm using reduced power loads that produce less recoil.
Conclusion
Rather than simply pointing your firearm at your intended target and pulling the trigger, mastering these fundamental aspects will help you develop more consistent accuracy.
Many shooters benefit significantly from having proper training from a certified firearms instructor. Live training like this can help you learn these seven aspects of accurate shooting much faster, with guidance tailored to your unique needs. But where do you find this kind of training?
At Pro Armory, we believe everyone should know how to safely and accurately shoot a firearm. That’s why we’ve developed live, online training courses to help you develop your skills at home. In these courses, you will not only learn the basics of how to safely handle, hold, and load your firearm from a certified professional firearms training instructor; you can also learn tactical movements, gun maintenance, and additional training exercises. With our training materials, you can finally feel confident with a firearm in any situation — whether you’re at the range or handling a deadly self-defense scenario.
Why wait? Sign up for Pro Armory’s newsletter to be notified when training officially launches.
Best Ammo Deals, Training, & Accessories
Subscribe to ProArmory sales and deals email.


")