To be a competent and effective firearm owner, practice is essential. But we rarely have the time or resources required to achieve mastery on the range. It must be time to just throw in the towel and accept mediocrity, right?

Wrong. Being a responsible firearm owner means being a trained firearm owner. If you can’t make it to the range all the time or buy a ton of ammo, you need to find another training solution to supplement your range time.

Dry fire training is the answer. Dry fire bridges the gap between the beginner and the range-trained expert, allowing shooters to develop the critical skills needed to become better shooters and get the most out of our limited time on the range.

However, as with any skill, we need specific exercises to upgrade our abilities. That’s where drills come in, each designed to improve specific aspects of our shooting. In this article, we’ll break down some specific dry fire drills as well as general tips on getting the most out of your dry fire training.

What Is Dry Fire Training?

Dry fire is the process of practicing shooting skills and tactics without the firing of live ammo. So much about effective shooting is determined before the trigger pull is complete. We can still practice these skills while minimizing time and money spent at the range.

Of course, there is no substitute for live fire, but you can dramatically improve the value and effectiveness of live fire training with dry fire reps.

Furthermore, dry fire gives you the opportunity to practice tactical skills that are usually not allowed at the range. For instance, immediate action drills, reloads, movement, and more can all be practiced without live ammo.

You can also practice dry fire at home, which is the location you will most likely have to defend in a real-world situation. Practicing with your gun at home can give you a significant advantage over home invaders.

7 Dry Fire Drills to Upgrade Your Skills

Let’s look at 7 proven dry fire drills you can do right at home to improve your firearm skills in several areas.

WARNING: ALWAYS clear your gun and make sure it’s safe prior to dry fire training. To build good habits, you should honestly clear and make sure the gun is safe every time you put it down, and never leave your firearm unattended out in the open.

To clear your gun:

  1. Point your gun in a safe direction with your finger off the trigger (as always).
  2. Remove the magazine. Set it aside. Don’t put it in your pocket or anywhere where you might grab it accidentally. Total separation.
  3. Lock the slide to the rear. If there’s a round in the chamber, it will pop out. Set it aside with the magazine. You might need to tilt the gun sideways to make the round fall out.
  4. Visually inspect the chamber, just in case.
  5. Manually inspect the chamber with your index finger, just in case.
  6. Release the slide lock. Your gun is clear and safe, and you’re ready to begin.

1. Fundamentals Drill

This drill focuses on the most fundamental shooting skill: sight picture and trigger press. No matter what situation you find yourself in, no matter what kind of fight, all shooting depends on this fundamental skill set. You should practice this every day if you can.

How to Drill:

  1. Set up a target on the wall and stand a “can’t miss” distance away.
  2. Hold the gun in the ready position in front of your chest with your arms retracted and the gun oriented on the target.
  3. Using a mental cue, present the gun toward the target while simultaneously acquiring a sight picture.
  4. Press through the trigger.
  5. Practice until you can press the trigger without disrupting the sight picture.

For additional challenges, you can shoot one-handed, with your weak hand, or from alternative positions such as kneeling, sitting, or prone. You can also move progressively farther from the target, space permitting. As always, if you start to screw up, slow everything down and start over. The goal is perfection.

Expert Mode:

You can use a shot timer or interval timer to provide an external cue. You can also use laser and/or accelerometer systems to provide detailed feedback about your grip, trigger press, and accuracy. The MantisX system is our top choice to enhance just about any dry fire training drill.

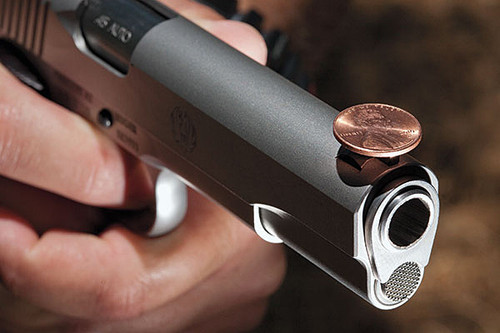
2. Coin Drill (aka The Dime Drill)

The purpose of this drill is to master grip and trigger control.

How to Drill:

  1. Place a coin on top of the slide near the front sight.
  2. Present the gun, acquire a sight picture, and press through the trigger.
  3. If the coin falls off, you’re yanking the gun during your trigger press.
  4. Practice until you can squeeze the trigger without the coin falling off.

Expert Mode:

Once you master the coin drill, investing in a system like MantisX can provide additional feedback about your trigger control as well as specific app-based coaching tips to fix any mistakes.

3. Wall Drill

The purpose of this drill is to develop front sight focus, which is key for correct sight picture and alignment. Front sight focus can be counterintuitive for new shooters as it seems like you would want to focus on your target. But you can only focus your vision in one place at a time and precise sight alignment takes priority. It’s easier to hit a blurry target with perfectly aligned sights than hit a clear target with blurry sights.

How to Drill:

  1. Stand near a blank wall (the blanker the better).
  2. Hold the gun in the ready position.
  3. Present the gun and acquire a sight picture (the muzzle will be a few inches from the wall).
  4. Focus your vision on the front sight.
  5. Practice until you can instantly and intuitively focus on the front sight.

The blank wall removes distractions from your field of view, helping your eyes and brain quickly find and lock on to the front sight post.

Expert Mode:

Once you can effectively focus on the front sight in front of a blank wall, go back to using simple, then more complex targets. This will help you control where your eyes focus in real-world situations, no matter the visual noise that gets in the way.

4. Transition Drill

The purpose of this drill is to practice shifting focus between your front sight and the environment. Remember, a real gunfight is not on a flat range. Despite stress-induced tunnel vision, you need to remain situationally aware and also acquire/engage targets quickly, rapidly shifting your visual focus between the world and your front sight.

How to Drill:

  1. Set up two targets on a wall, about 10 feet apart.
  2. Stand about 10 feet from the wall.
  3. From a ready position, acquire a sight picture on the first target, then fire.
  4. Shift only your eyes and focus on the second target.
  5. Shift your body and gun to orient on the second target.
  6. Shift your vision back to the front sight and acquire a sight picture.
  7. Practice (slowly at first) until you can rapidly achieve this visual shift.

Remember, you’ll have a dead trigger on the second target, so don’t squeeze the trigger. The drill ends when you acquire the second sight picture. Also, the placement of you and the targets are not specific. Change them up and be creative.

Expert Mode:

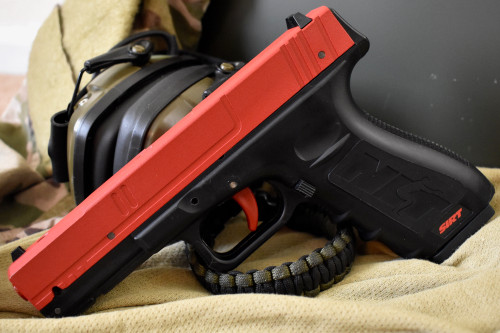
Once you master the basics, you can invest in an SIRT replica pistol training device which provides realistic trigger reset. With a resetting trigger, this drill can be expanded to include many more targets, forcing you to constantly shift your vision.

5. Draw Drill

Moving past the fundamentals, we can explore some tactical drills, a key benefit of dry fire training. The most important tactical skill to develop is the draw. If you can’t smoothly and flawlessly get the gun in the fight, it’s useless.

How to Drill:

  1. Wearing your normal clothes, stand ready with your hands at your sides.
  2. On a mental cue, clear your covering garments.
  3. Draw the gun.
  4. Present the gun, acquire a target, and press through the trigger.
  5. Holster the gun.
  6. Practice until you can clear and draw flawlessly and holster without looking and without the gun catching on your clothes.

Expert Mode:

You can expand this drill by practicing with different cover garments and drawing from different positions. Also, practice while carrying a grocery bag or briefcase to train yourself to drop what’s in your hand when you have to act against a threat. Many people have gone through entire life-and-death fights clinging to some object they forgot to drop. Extreme stress is weird.

6. Reload Drill

The next tactical skill you need to develop is the magazine change. Like everything else, it seems easy now, but will be extremely difficult under stress. This must be practiced repeatedly to make it automatic.

It’s important to train looking at the gun while performing magazine changes. You’re going to want to keep looking at the target, but you have to shift focus to the gun to successfully change the magazine. It’s like trying to get a key in a car door while a mad tiger is bearing down on you. You’ll want to look at the tiger, but if you can’t focus on the key, you’re going to be that tiger’s dinner.

The spot right in front of your nose is called the workspace position. Use this position to focus your vision and attention on the gun while maintaining situational awareness of the target beyond.

How to Drill:

  1. Begin with the gun extended and the slide locked to the rear.
  2. Squeeze the dead trigger, cuing the gun is empty.
  3. Return the gun to the workspace position.
  4. Focus your eyes on the gun.
  5. Eject the magazine (drop or pocket).
  6. Grab a new magazine.
  7. Insert the magazine and tap to ensure it is seated.
  8. Release the slide lock.
  9. Present the gun, acquire a sight picture, and press through the trigger.
  10. Practice this sequence of events until it is smooth and flawless.

Expert Mode:

You can enhance this drill by investing in weighted dummy magazines to more accurately simulate the correct weight of loaded magazines. It might not seem like much, but it’s one more way to make your dry fire as realistic as possible.

7. Movement Drill

In a real fight, you likely won’t be standing still, especially if bullets are coming your way. Develop the ability to move comfortably with your gun while maintaining safety, situational awareness, and muzzle discipline.

How to Drill:

One of the most useful movement drills you can do as a home defender is to practice dry fire clearing your house. With nobody home, move through your house clearing each room. Maintain awareness of cover and concealment as well as backstopping for your shots. This information is critical if you ever need to defend your home from intruders.

However, it’s important to remember that room clearing (especially with just one person) is not a basic skill. This is an advanced tactical process that requires expert training. Make sure you are well-trained first before you start running around your house developing bad habits!

Expert Mode:

Invest in a modular laser target system that can be set up in various rooms in your house. These systems will give you important feedback about accuracy and speed while also making the process more engaging and realistic.

Bonus Range Drill: Snap Cap Surprise

Dry fire drills can also be incorporated into your range training. The purpose of this drill is twofold:

  • First, it will reveal if you are flinching or anticipating your shots.
  • Second, it will give you the opportunity to practice clearing a malfunction.

How to Drill:

  1. Randomly mix one snap cap into your live-round magazines.
  2. As you shoot, you will experience a dud unexpectedly.
  3. Make a mental note if you flinched or anticipated the shot.
  4. Immediately clear the snap cap (tap and rack) and continue firing.

The key is to not freeze when your gun malfunctions due to a dud round, feed failure, jam, or other malfunction. Just clear the problem and continue shooting. Murphy’s Law guarantees you’ll have a malfunction at the worst possible time, so this drill helps you be ready when it happens.

As for the feeling of a dud round, it’s like when you’re going down the stairs at night and anticipate another stair but you’re already at the bottom. These kinds of anticipatory reactions can throw off your aim, so it’s important to eliminate them from your shooting.

Bonus Range Drill: Dry Fire Sandwich

The purpose of this drill is to mix dry and live fire to calibrate your technique and identify errors that are only present during live fire training. Obviously, you can’t perform this drill entirely in your home. You’ll need access to a range for this one.

How to Drill:

  1. Practice fundamentals with dry fire.
  2. Proceed to live fire, maintaining the same focus on the fundamentals.
  3. Return to dry fire and analyze your mechanics for flinch or anticipation.
  4. Practice until your dry and live fire mechanics are identical.

The period immediately following live fire provides a time-limited opportunity to measure your skills while anticipating a live round, so use it when you can.

Tips for Effective Dry Fire Training

Dry fire is a highly effective training method, but can also be useless or even counterproductive if you don’t know what you’re doing. Here are some key principles to keep in mind to ensure optimal and effective dry fire training.

Snap Caps and Gun Damage

The first concern of most shooters is that dry fire will damage your gun because the firing pin is hitting empty air. Generally, this isn’t true for modern handguns and other centerfire guns. However, rimfire guns might be susceptible to damage, so we recommend using snap caps to absorb the energy from the firing pin.

A snap cap is a specialized plastic dummy round designed to mimic the look and feel of real rounds. Snap caps can be inserted into your magazine and gun to fill in the space where a live round would normally be, making your dry fire training more realistic. Check out these A-Zoom 9mm snap caps — they look exactly like 9mm bullets (and insert into your firearm just the same), but without gunpowder.

Beyond protection from possible gun damage, snap caps are useful for dry fire training because they can simulate malfunctions and dud rounds (as described in the bonus drill above). Training to manage malfunctions is essential for shooter development, and snaps caps are a cheap and easy tool that can help develop this skill. If you’re going to invest in any gear to support your dry fire training, we recommend starting with snap caps.

Don’t Develop Bad Habits

With gunfighting, everything depends on the habits you’ve built in training. This is great — as long as you’ve built good habits. Remember, we’re always building habits, so it’s critical that we’re building good habits, even when we aren’t firing live ammo.

Consider this anecdote that floats around self defense circles: A police officer trained extensively in the art of gun disarms would often snatch a dummy gun from his training partner, hand it back, and do it again. He would do this thousands of times over the course of many years. One day, a real-life criminal pulls a gun on the cop. Without thinking, the cop’s training takes over and he snatches the gun with lightning speed — then hands it back to the criminal! Why? Because that’s exactly what he trained to do for all those years: snatch the gun, then hand it back.

Who knows if this story is true — but the point still stands: under extreme stress, you will default to your training. If you embrace dry fire training, your dry fire reps could drastically outnumber your live fire reps, so make sure you're using the exact techniques you want to perform unconsciously in a real scenario.

Live Trigger vs Dead Trigger

One of the key limitations of dry fire training is the lack of trigger reset. When you fire a semi-automatic handgun, the departing round cycles the slide, loads the next round, and resets the trigger. Without a live round in dry fire, this process doesn’t occur, so you only get one live trigger pull before manually racking the slide again.

Thiscan create two bad habits:

  • First, don’t practice pulling a dead trigger. Dead trigger means the gun is empty or malfunctioning, so don’t disrupt this important cue.
  • Second, don’t get in the habit of constantly racking the slide to continue a drill, or you might do the same thing on the range — or worse, during a real fight.

Just accept that these drills are limited to one live trigger pull only, and focus on that.

Use Specific Targets

Always use specific targets for dry fire and put them away immediately after training. You never want to be in a position where you spot that target and, after thousands of dry fire reps, decide to take a few more after you’ve reloaded the gun. This might seem absurd, but the brain is a strange organ. Sometimes we need to outhink ourselves for our own good. You might even want to set aside a specific room in your house for drills — one that has the least risk of damage, should you accidentally fire a live projectile somehow.

Remember the Four Laws of Firearm Safety

Yes, you’re training with an empty gun, but you still need to remember and follow the core principles of gun safety. Again, build the right habits.

  1. Always treat the gun as if it is loaded.
  2. Never point the gun at anything you’re not willing to destroy.
  3. Keep your finger off the trigger until you’re ready to fire.
  4. Be sure of your target and beyond.

Remembering these rules can also teach you where in your house you can safely point your gun, which is critical knowledge in a home invasion.

Be Brutally Honest

Since you’re your own coach here, you need to be brutally honest about your results. At the range, a target with a hole in it (or not) provides obvious feedback. With dry fire, you only have your eyes. Be honest about your performance so you can self-correct. Lying to yourself won’t do you any favors. However, if you feel you aren’t the best judge of your technique, a dry fire training system like MantisX can provide coaching tips to enhance your dry fire drill.

Slow Is Smooth, Smooth Is Fast

Everybody wants to be quick, but you can’t do it right quickly until you can do it right slowly. Start these drills as slow as necessary to nail the motion/action perfectly. Once you can do it slowly, then gradually increase the speed. The moment you fail to achieve the goal of the drill or you get sloppy, slow down again. Speed will come with mastery.

Train With a Purpose

Practice with a specific goal, keep a training journal, and try to focus on your weaknesses. Just like going to the gym, the goal is to develop your weak points, not focus on what you’re already good at.

Also, due to minimal setup time, dry fire gives you the opportunity to practice in small chunks daily or even multiple times per day. Almost all skills are learned better in small, frequent doses rather than in large, infrequent blocks.

Repetition is the Mother of All Shooting Skills

We only have so much time and money to invest in improving our shooting skills. Of course, it would be great to have more range time, but with competing responsibilities and brutal ammo prices, we do our best with what we have.

To be clear, dry fire isn’t a replacement for range time. You still need to put in time with live rounds to be effective. However, dry fire training bridges that gap by developing critical skills that will enhance your limited range time. By working through these drills slowly and carefully and focusing on perfection, you can significantly improve your shooting skills without stepping out your door.

If you’re ready to take your firearms training to the next level, sign up for our newsletter to receive notifications about our future training courses. We also offer a wide selection of ammo and tactical gear to get you ready for whatever comes your way.

Supporting Veterans

Supporting Veterans

Veteran Operated

Veteran Operated

Speedy Shipping

Speedy Shipping

Security

Security is Our Priority

Table Of Contents

    7 Dry Fire Drills To Practice At Home for Firearm Mastery

    7 Dry Fire Drills To Practice At Home for Firearm Mastery

    September 19, 2023

    To be a competent and effective firearm owner, practice is essential. But we rarely have the time or resources required to achieve mastery on the range. It must be time to just throw in the towel and accept mediocrity, right?

    Wrong. Being a responsible firearm owner means being a trained firearm owner. If you can’t make it to the range all the time or buy a ton of ammo, you need to find another training solution to supplement your range time.

    Dry fire training is the answer. Dry fire bridges the gap between the beginner and the range-trained expert, allowing shooters to develop the critical skills needed to become better shooters and get the most out of our limited time on the range.

    However, as with any skill, we need specific exercises to upgrade our abilities. That’s where drills come in, each designed to improve specific aspects of our shooting. In this article, we’ll break down some specific dry fire drills as well as general tips on getting the most out of your dry fire training.

    What Is Dry Fire Training?

    Dry fire is the process of practicing shooting skills and tactics without the firing of live ammo. So much about effective shooting is determined before the trigger pull is complete. We can still practice these skills while minimizing time and money spent at the range.

    Of course, there is no substitute for live fire, but you can dramatically improve the value and effectiveness of live fire training with dry fire reps.

    Furthermore, dry fire gives you the opportunity to practice tactical skills that are usually not allowed at the range. For instance, immediate action drills, reloads, movement, and more can all be practiced without live ammo.

    You can also practice dry fire at home, which is the location you will most likely have to defend in a real-world situation. Practicing with your gun at home can give you a significant advantage over home invaders.

    7 Dry Fire Drills to Upgrade Your Skills

    Let’s look at 7 proven dry fire drills you can do right at home to improve your firearm skills in several areas.

    WARNING: ALWAYS clear your gun and make sure it’s safe prior to dry fire training. To build good habits, you should honestly clear and make sure the gun is safe every time you put it down, and never leave your firearm unattended out in the open.

    To clear your gun:

    1. Point your gun in a safe direction with your finger off the trigger (as always).
    2. Remove the magazine. Set it aside. Don’t put it in your pocket or anywhere where you might grab it accidentally. Total separation.
    3. Lock the slide to the rear. If there’s a round in the chamber, it will pop out. Set it aside with the magazine. You might need to tilt the gun sideways to make the round fall out.
    4. Visually inspect the chamber, just in case.
    5. Manually inspect the chamber with your index finger, just in case.
    6. Release the slide lock. Your gun is clear and safe, and you’re ready to begin.

    1. Fundamentals Drill

    This drill focuses on the most fundamental shooting skill: sight picture and trigger press. No matter what situation you find yourself in, no matter what kind of fight, all shooting depends on this fundamental skill set. You should practice this every day if you can.

    How to Drill:

    1. Set up a target on the wall and stand a “can’t miss” distance away.
    2. Hold the gun in the ready position in front of your chest with your arms retracted and the gun oriented on the target.
    3. Using a mental cue, present the gun toward the target while simultaneously acquiring a sight picture.
    4. Press through the trigger.
    5. Practice until you can press the trigger without disrupting the sight picture.

    For additional challenges, you can shoot one-handed, with your weak hand, or from alternative positions such as kneeling, sitting, or prone. You can also move progressively farther from the target, space permitting. As always, if you start to screw up, slow everything down and start over. The goal is perfection.

    Expert Mode:

    You can use a shot timer or interval timer to provide an external cue. You can also use laser and/or accelerometer systems to provide detailed feedback about your grip, trigger press, and accuracy. The MantisX system is our top choice to enhance just about any dry fire training drill.

    2. Coin Drill (aka The Dime Drill)

    The purpose of this drill is to master grip and trigger control.

    How to Drill:

    1. Place a coin on top of the slide near the front sight.
    2. Present the gun, acquire a sight picture, and press through the trigger.
    3. If the coin falls off, you’re yanking the gun during your trigger press.
    4. Practice until you can squeeze the trigger without the coin falling off.

    Expert Mode:

    Once you master the coin drill, investing in a system like MantisX can provide additional feedback about your trigger control as well as specific app-based coaching tips to fix any mistakes.

    3. Wall Drill

    The purpose of this drill is to develop front sight focus, which is key for correct sight picture and alignment. Front sight focus can be counterintuitive for new shooters as it seems like you would want to focus on your target. But you can only focus your vision in one place at a time and precise sight alignment takes priority. It’s easier to hit a blurry target with perfectly aligned sights than hit a clear target with blurry sights.

    How to Drill:

    1. Stand near a blank wall (the blanker the better).
    2. Hold the gun in the ready position.
    3. Present the gun and acquire a sight picture (the muzzle will be a few inches from the wall).
    4. Focus your vision on the front sight.
    5. Practice until you can instantly and intuitively focus on the front sight.

    The blank wall removes distractions from your field of view, helping your eyes and brain quickly find and lock on to the front sight post.

    Expert Mode:

    Once you can effectively focus on the front sight in front of a blank wall, go back to using simple, then more complex targets. This will help you control where your eyes focus in real-world situations, no matter the visual noise that gets in the way.

    4. Transition Drill

    The purpose of this drill is to practice shifting focus between your front sight and the environment. Remember, a real gunfight is not on a flat range. Despite stress-induced tunnel vision, you need to remain situationally aware and also acquire/engage targets quickly, rapidly shifting your visual focus between the world and your front sight.

    How to Drill:

    1. Set up two targets on a wall, about 10 feet apart.
    2. Stand about 10 feet from the wall.
    3. From a ready position, acquire a sight picture on the first target, then fire.
    4. Shift only your eyes and focus on the second target.
    5. Shift your body and gun to orient on the second target.
    6. Shift your vision back to the front sight and acquire a sight picture.
    7. Practice (slowly at first) until you can rapidly achieve this visual shift.

    Remember, you’ll have a dead trigger on the second target, so don’t squeeze the trigger. The drill ends when you acquire the second sight picture. Also, the placement of you and the targets are not specific. Change them up and be creative.

    Expert Mode:

    Once you master the basics, you can invest in an SIRT replica pistol training device which provides realistic trigger reset. With a resetting trigger, this drill can be expanded to include many more targets, forcing you to constantly shift your vision.

    5. Draw Drill

    Moving past the fundamentals, we can explore some tactical drills, a key benefit of dry fire training. The most important tactical skill to develop is the draw. If you can’t smoothly and flawlessly get the gun in the fight, it’s useless.

    How to Drill:

    1. Wearing your normal clothes, stand ready with your hands at your sides.
    2. On a mental cue, clear your covering garments.
    3. Draw the gun.
    4. Present the gun, acquire a target, and press through the trigger.
    5. Holster the gun.
    6. Practice until you can clear and draw flawlessly and holster without looking and without the gun catching on your clothes.

    Expert Mode:

    You can expand this drill by practicing with different cover garments and drawing from different positions. Also, practice while carrying a grocery bag or briefcase to train yourself to drop what’s in your hand when you have to act against a threat. Many people have gone through entire life-and-death fights clinging to some object they forgot to drop. Extreme stress is weird.

    6. Reload Drill

    The next tactical skill you need to develop is the magazine change. Like everything else, it seems easy now, but will be extremely difficult under stress. This must be practiced repeatedly to make it automatic.

    It’s important to train looking at the gun while performing magazine changes. You’re going to want to keep looking at the target, but you have to shift focus to the gun to successfully change the magazine. It’s like trying to get a key in a car door while a mad tiger is bearing down on you. You’ll want to look at the tiger, but if you can’t focus on the key, you’re going to be that tiger’s dinner.

    The spot right in front of your nose is called the workspace position. Use this position to focus your vision and attention on the gun while maintaining situational awareness of the target beyond.

    How to Drill:

    1. Begin with the gun extended and the slide locked to the rear.
    2. Squeeze the dead trigger, cuing the gun is empty.
    3. Return the gun to the workspace position.
    4. Focus your eyes on the gun.
    5. Eject the magazine (drop or pocket).
    6. Grab a new magazine.
    7. Insert the magazine and tap to ensure it is seated.
    8. Release the slide lock.
    9. Present the gun, acquire a sight picture, and press through the trigger.
    10. Practice this sequence of events until it is smooth and flawless.

    Expert Mode:

    You can enhance this drill by investing in weighted dummy magazines to more accurately simulate the correct weight of loaded magazines. It might not seem like much, but it’s one more way to make your dry fire as realistic as possible.

    7. Movement Drill

    In a real fight, you likely won’t be standing still, especially if bullets are coming your way. Develop the ability to move comfortably with your gun while maintaining safety, situational awareness, and muzzle discipline.
    How to Drill:

    One of the most useful movement drills you can do as a home defender is to practice dry fire clearing your house. With nobody home, move through your house clearing each room. Maintain awareness of cover and concealment as well as backstopping for your shots. This information is critical if you ever need to defend your home from intruders.

    However, it’s important to remember that room clearing (especially with just one person) is not a basic skill. This is an advanced tactical process that requires expert training. Make sure you are well-trained first before you start running around your house developing bad habits!

    Expert Mode:

    Invest in a modular laser target system that can be set up in various rooms in your house. These systems will give you important feedback about accuracy and speed while also making the process more engaging and realistic.

    Bonus Range Drill: Snap Cap Surprise

    Dry fire drills can also be incorporated into your range training. The purpose of this drill is twofold:

    • First, it will reveal if you are flinching or anticipating your shots.
    • Second, it will give you the opportunity to practice clearing a malfunction.

    How to Drill:

    1. Randomly mix one snap cap into your live-round magazines.
    2. As you shoot, you will experience a dud unexpectedly.
    3. Make a mental note if you flinched or anticipated the shot.
    4. Immediately clear the snap cap (tap and rack) and continue firing.

    The key is to not freeze when your gun malfunctions due to a dud round, feed failure, jam, or other malfunction. Just clear the problem and continue shooting. Murphy’s Law guarantees you’ll have a malfunction at the worst possible time, so this drill helps you be ready when it happens.

    As for the feeling of a dud round, it’s like when you’re going down the stairs at night and anticipate another stair but you’re already at the bottom. These kinds of anticipatory reactions can throw off your aim, so it’s important to eliminate them from your shooting.

    Bonus Range Drill: Dry Fire Sandwich

    The purpose of this drill is to mix dry and live fire to calibrate your technique and identify errors that are only present during live fire training. Obviously, you can’t perform this drill entirely in your home. You’ll need access to a range for this one.

    How to Drill:

    1. Practice fundamentals with dry fire.
    2. Proceed to live fire, maintaining the same focus on the fundamentals.
    3. Return to dry fire and analyze your mechanics for flinch or anticipation.
    4. Practice until your dry and live fire mechanics are identical.

    The period immediately following live fire provides a time-limited opportunity to measure your skills while anticipating a live round, so use it when you can.

    Tips for Effective Dry Fire Training

    Dry fire is a highly effective training method, but can also be useless or even counterproductive if you don’t know what you’re doing. Here are some key principles to keep in mind to ensure optimal and effective dry fire training.

    Snap Caps and Gun Damage

    The first concern of most shooters is that dry fire will damage your gun because the firing pin is hitting empty air. Generally, this isn’t true for modern handguns and other centerfire guns. However, rimfire guns might be susceptible to damage, so we recommend using snap caps to absorb the energy from the firing pin.

    A snap cap is a specialized plastic dummy round designed to mimic the look and feel of real rounds. Snap caps can be inserted into your magazine and gun to fill in the space where a live round would normally be, making your dry fire training more realistic. Check out these A-Zoom 9mm snap caps — they look exactly like 9mm bullets (and insert into your firearm just the same), but without gunpowder.

    Beyond protection from possible gun damage, snap caps are useful for dry fire training because they can simulate malfunctions and dud rounds (as described in the bonus drill above). Training to manage malfunctions is essential for shooter development, and snaps caps are a cheap and easy tool that can help develop this skill. If you’re going to invest in any gear to support your dry fire training, we recommend starting with snap caps.

    Don’t Develop Bad Habits

    With gunfighting, everything depends on the habits you’ve built in training. This is great — as long as you’ve built good habits. Remember, we’re always building habits, so it’s critical that we’re building good habits, even when we aren’t firing live ammo.

    Consider this anecdote that floats around self defense circles: A police officer trained extensively in the art of gun disarms would often snatch a dummy gun from his training partner, hand it back, and do it again. He would do this thousands of times over the course of many years. One day, a real-life criminal pulls a gun on the cop. Without thinking, the cop’s training takes over and he snatches the gun with lightning speed — then hands it back to the criminal! Why? Because that’s exactly what he trained to do for all those years: snatch the gun, then hand it back.

    Who knows if this story is true — but the point still stands: under extreme stress, you will default to your training. If you embrace dry fire training, your dry fire reps could drastically outnumber your live fire reps, so make sure you're using the exact techniques you want to perform unconsciously in a real scenario.

    Live Trigger vs Dead Trigger

    One of the key limitations of dry fire training is the lack of trigger reset. When you fire a semi-automatic handgun, the departing round cycles the slide, loads the next round, and resets the trigger. Without a live round in dry fire, this process doesn’t occur, so you only get one live trigger pull before manually racking the slide again.

    Thiscan create two bad habits:

    • First, don’t practice pulling a dead trigger. Dead trigger means the gun is empty or malfunctioning, so don’t disrupt this important cue.
    • Second, don’t get in the habit of constantly racking the slide to continue a drill, or you might do the same thing on the range — or worse, during a real fight.

    Just accept that these drills are limited to one live trigger pull only, and focus on that.

    Use Specific Targets

    Always use specific targets for dry fire and put them away immediately after training. You never want to be in a position where you spot that target and, after thousands of dry fire reps, decide to take a few more after you’ve reloaded the gun. This might seem absurd, but the brain is a strange organ. Sometimes we need to outhink ourselves for our own good. You might even want to set aside a specific room in your house for drills — one that has the least risk of damage, should you accidentally fire a live projectile somehow.

    Remember the Four Laws of Firearm Safety

    Yes, you’re training with an empty gun, but you still need to remember and follow the core principles of gun safety. Again, build the right habits.

    1. Always treat the gun as if it is loaded.
    2. Never point the gun at anything you’re not willing to destroy.
    3. Keep your finger off the trigger until you’re ready to fire.
    4. Be sure of your target and beyond.

    Remembering these rules can also teach you where in your house you can safely point your gun, which is critical knowledge in a home invasion.

    Be Brutally Honest

    Since you’re your own coach here, you need to be brutally honest about your results. At the range, a target with a hole in it (or not) provides obvious feedback. With dry fire, you only have your eyes. Be honest about your performance so you can self-correct. Lying to yourself won’t do you any favors. However, if you feel you aren’t the best judge of your technique, a dry fire training system like MantisX can provide coaching tips to enhance your dry fire drill.

    Slow Is Smooth, Smooth Is Fast

    Everybody wants to be quick, but you can’t do it right quickly until you can do it right slowly. Start these drills as slow as necessary to nail the motion/action perfectly. Once you can do it slowly, then gradually increase the speed. The moment you fail to achieve the goal of the drill or you get sloppy, slow down again. Speed will come with mastery.

    Train With a Purpose

    Practice with a specific goal, keep a training journal, and try to focus on your weaknesses. Just like going to the gym, the goal is to develop your weak points, not focus on what you’re already good at.

    Also, due to minimal setup time, dry fire gives you the opportunity to practice in small chunks daily or even multiple times per day. Almost all skills are learned better in small, frequent doses rather than in large, infrequent blocks.

    Repetition is the Mother of All Shooting Skills

    We only have so much time and money to invest in improving our shooting skills. Of course, it would be great to have more range time, but with competing responsibilities and brutal ammo prices, we do our best with what we have.

    To be clear, dry fire isn’t a replacement for range time. You still need to put in time with live rounds to be effective. However, dry fire training bridges that gap by developing critical skills that will enhance your limited range time. By working through these drills slowly and carefully and focusing on perfection, you can significantly improve your shooting skills without stepping out your door.

    If you’re ready to take your firearms training to the next level, sign up for our newsletter to receive notifications about our future training courses. We also offer a wide selection of ammo and tactical gear to get you ready for whatever comes your way.