


 Pro Armory Editorial Team
Quick Answer
Building an AR-15 lower receiver takes you through installing the magazine catch, trigger guard, bolt catch, trigger assembly, safety/grip, takedown pins, and buffer system. You'll need just a few basic tools like punches and a hammer. Take your time with small parts and springs. This guide is for educational purposes only—always follow federal, state, and local laws when building firearms.
Key Takeaways
- Use brass/nylon tools to avoid marring your lower finish.
- Control small detents; work over a box to catch flying parts.
- Set magazine catch depth correctly for proper function.
- Time buffer tube installation to capture retainer without binding it.
- Stake the castle nut only after full function testing. Staking means displacing a small amount of metal from the end plate into the castle nut notch to prevent it from backing off.
There's something deeply satisfying about building your own AR-15 lower receiver. The process connects you to your firearm in a way that buying completely just can't match. You pick every component, learn how they work together, and gain the confidence to maintain your gun for years to come.
Don't worry if this is your first build. This guide breaks down each step with clear instructions. I've included tips I learned through my own mistakes so you can avoid them. By the time we're done, you'll have a custom lower built with your own hands—and the knowledge to do it again.
Ready to jump in? Let's build something cool together.
Educational & Safety Disclaimer
This guide is for educational purposes only. Always follow federal, state, and local laws regarding firearms assembly. In the United States, the receiver is legally considered the firearm and subject to applicable regulations. In U.S. law, the AR-15 lower receiver is the serialized component legally defined as the firearm. It must be transferred through an FFL. All other parts, such as lower parts kits and buffer assemblies, can typically be purchased without an FFL, though some states impose additional restrictions.
If you lack proper tools or experience, consider having a professional gunsmith complete your build or purchase a completed firearm. Always wear eye protection and hand protection during assembly, especially when working with springs and detents.
Gloves designed for fine work can help prevent cuts and protect your hands from sharp detents or accidental tool slips. Work in a secure area, under strong lighting, over a non-cluttered surface, and consider using a parts tray or magnetic mat to prevent losing small springs and detents, and never dry-fire a bare lower as this can damage internal components.
Always wait to function-check fire controls until the lower is paired with an upper, or use a purpose-built block to prevent hammer damage.
Complete AR-15 Lowers (Prebuilt Option)
| Option | What you do | Tools needed | Pros (from article) | Considerations (from article) |
|---|---|---|---|---|
| Complete AR-15 Lower (Prebuilt) | Attach your upper receiver; it comes fully assembled with internals. | No specialized tools needed (assembly done by manufacturer). | Saves time; eliminates need for specialized tools; typically includes manufacturer warranty; featureless-compliant lowers available for restricted states. | Less DIY learning/customization than building yourself. |
| DIY Build (Stripped Lower + Parts) | Install magazine catch, trigger guard, bolt catch, trigger, safety/grip, takedown pins, buffer system (step-by-step). | Brass/nylon punches; non-marring hammer; long-arm hex keys; 4" C-clamp; armorer’s wrench; utility knife/razor; tape/cloth; small container. | Choose every component; learn how parts work; gain confidence to maintain; satisfying hands-on build. | Work carefully with small parts/detents; avoid marring finish (use brass/nylon tools); follow laws; don’t dry-fire a bare lower. |
Not ready to build from scratch? Complete AR-15 lowers offer an easier path. These come fully assembled with all internal components installed professionally. You simply attach your upper receiver and you're ready to go.
Complete lowers save time and eliminate the need for specialized tools. They also typically come with manufacturer warranties. For those in restricted states, featureless compliant lowers are available to keep you legal.
Certain states also regulate features such as collapsible stocks, pistol grips, or magazine release mechanisms—always verify your local compliance requirements before purchasing or assembling components.
But if you're ready for the DIY approach, let's continue with our build guide!
Table of Contents
- Parts & Tools
- Magazine Catch Assembly
- Trigger Guard Assembly
- Bolt Catch Assembly
- Trigger Assembly
- Safety, Takedown Pin, Grip, & Receiver Extension
- AR-15 Lower Receiver Upgrades
- Conclusion
Parts & Tools
Parts (what this build uses)
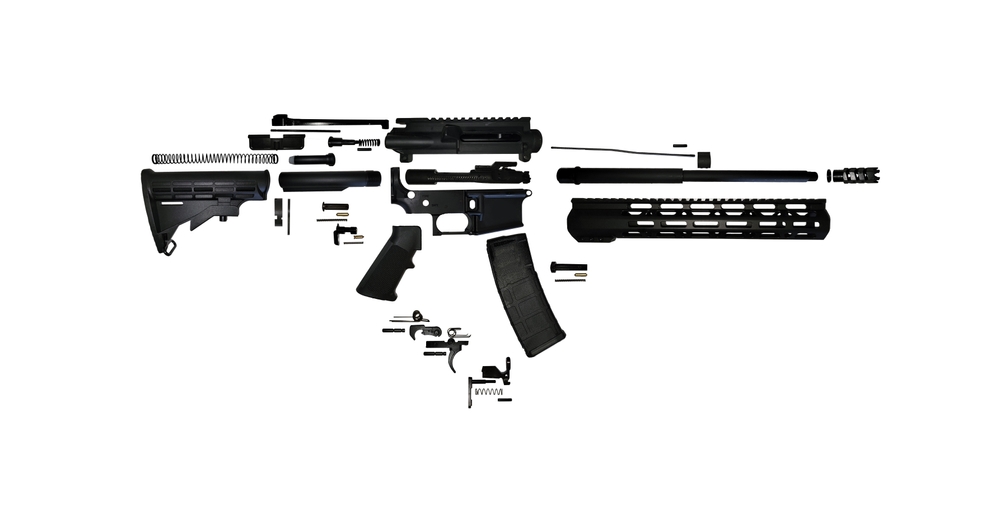
To build your AR-15 lower, you'll need these core components:
- Stripped lower receiver (aluminum or polymer)
- Lower parts kit (LPK) with all small components
- Buffer tube kit (receiver extension, castle nut, end plate, buffer, spring)
- Stock (fixed or adjustable)
- Optional featureless grip for restricted states — in jurisdictions with assault-weapon feature bans, “featureless grips” are alternative designs that reduce or eliminate a conventional pistol-grip profile to comply with local laws.
Quality matters more than fancy brand names. Buy from reputable sellers, and check with your local gun shop to avoid transfer fees and shipping delays.
Tools (minimal, non-marring)
You can complete this build with these basic tools:
- Brass or nylon punch set (prevents finish damage)
- Non-marring hammer with plastic/rubber faces
- Long-arm hex keys for better leverage
- 4" C-clamp for trigger guard installation
- AR armorer's wrench for castle nut
- Utility knife/razor blade for pivot pin trick
- Tape or cloth to protect surfaces
- Small container to catch springs and detents
Magazine Catch Assembly
Let's start with one of the simplest parts: the magazine catch. It's a good confidence builder before tackling trickier components.
First, locate these three parts in your kit: the magazine catch spring (the largest diameter spring), the magazine release button, and the magazine catch itself.
Drop the magazine spring into its hole on the left side of the receiver. Place the magazine release button on top with the serrated side facing outward. Press it in to compress the spring.
Now comes the slightly tricky part. Keep the button pressed, flip the receiver over, and start threading in the magazine catch. This can be awkward at first—align the threads carefully and turn clockwise. The catch should thread in without scraping against the raised areas inside the receiver.
To set the proper depth, press the magazine release button flush against the receiver and continue tightening the catch. You want the catch to sit just inside the magazine well—not too deep or too shallow. Test with a magazine to ensure it locks securely and releases cleanly when you press the button.
Trigger Guard Assembly
Some premium lowers have an integrated trigger guard. If yours doesn't, you'll need to install the separate guard and be careful with those fragile "ears" on the receiver.
Find the trigger guard and the longer roll pin from your parts kit. Depress the spring-loaded pin on one end of the guard (near the magazine well) and slip that end into the front hole of the receiver.
Now align the rear of the guard with the "ears" of the receiver. These thin aluminum projections can snap off if not properly supported during pin installation. Seriously, this happens all the time to new builders.
Start the roll pin with light hammer taps or just your fingers. Once started, either continue with gentle hammer taps (supporting the ears!) or use a C-clamp to press it in. Put some tape or plastic between the clamp jaws and receiver to prevent scratches.
Go slowly and make sure the pin enters straight. Once fully seated, check that the trigger guard moves freely on its pivot.
Bolt Catch Assembly
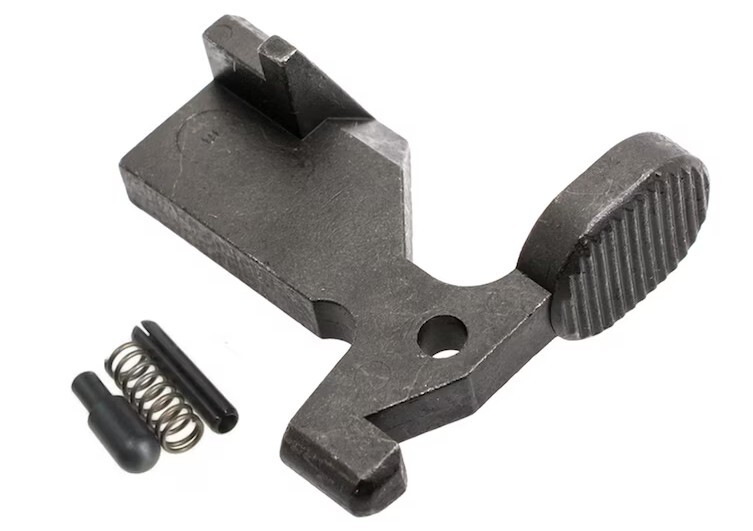
The bolt catch requires patience to avoid scratching your receiver finish. Find the bolt catch, its spring, plunger, and small roll pin. The bolt catch spring has a consistent diameter throughout.
Insert the spring onto the plunger, then drop this assembly into the small hole above the magazine well. Position the bolt catch so it aligns with the hole for the roll pin.
You'll need to depress the bolt catch to align everything. Use a punch to start the roll pin, then either continue with the punch or use cloth-wrapped pliers to press it in. Work carefully—this area gets scratched easily.
Test the bolt catch movement after installation. It should move freely without binding. If it feels stiff, check that the pin isn't putting pressure on the catch itself.
Trigger Assembly
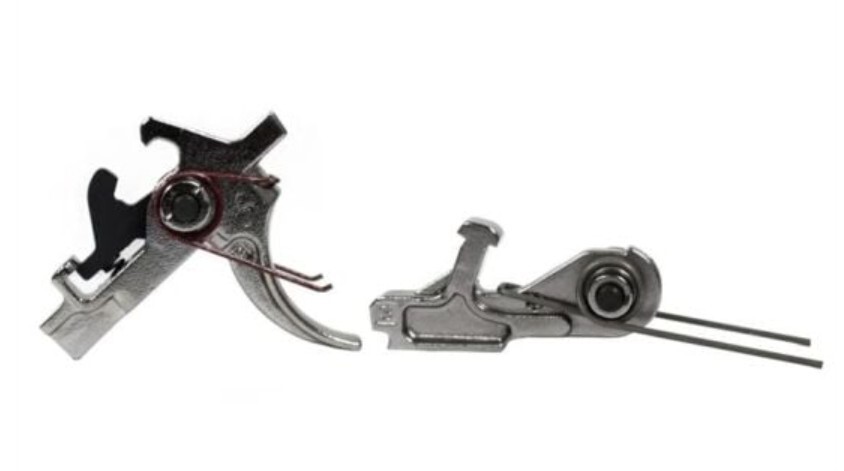
The trigger assembly is the heart of your lower. This part requires careful attention to spring orientation.
Gather your trigger, hammer, disconnector, and their springs. The disconnector spring has one end thicker than the other—this fat end goes down into the trigger.
Place the trigger spring on the trigger with legs pointing forward. Insert the disconnector spring (fat side down) into the trigger, then place the disconnector on top.
Hold this assembly together and lower it into position in the receiver. Align the holes and insert the trigger pin. You may need a brass punch to help the pin through if it gets tight.
For the hammer, place its spring with legs resting on top of the trigger pin you just installed. Position the hammer and align its holes with the receiver. The second pin can be stubborn due to spring tension. Try cocking the hammer back once the pin is started to reduce pressure.
IMPORTANT: Never dry-fire a lower without an upper attached! The hammer will strike the back of the receiver and cause damage. Always catch the hammer with your thumb when testing.
Safety, Takedown Pin, Grip, & Receiver Extension
Safety Selector

Make sure the hammer is cocked back to open the safety selector hole. Insert the safety selector oriented to "FIRE" position.
Install the small safety detent (pointed end in) from the right side of the receiver. This tiny part will engage with the selector's groove.
Grip
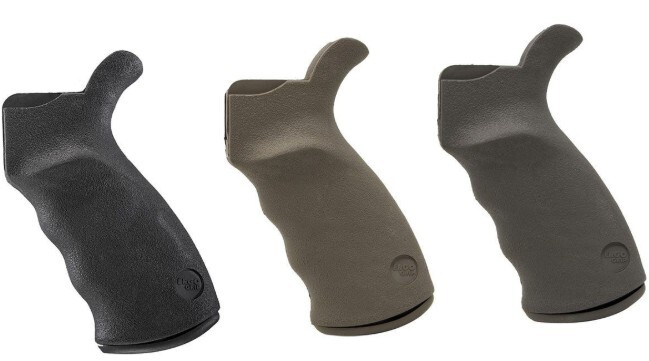
The grip houses the safety detent spring. Insert this spring into the top hole of your pistol grip. Then, carefully align the grip with the receiver. You need to make sure the spring lines up with the detent.
Some grips need slight spreading to fit over the receiver tang. A flat screwdriver can help widen the grip slightly.
With everything aligned, secure the grip using the included screw and washer. Test the safety selector to ensure it moves properly between positions.
Rear Takedown Pin

Find the shorter rear takedown pin. Insert it from left to right with its channel positioned to accept the detent.
Place the detent in the small hole at the rear of the receiver, followed by its spring. This spring will be captured by the end plate in a later step.
Receiver Extension (Buffer Tube)

This step requires careful attention to avoid damaging parts.
First, place the buffer retainer and its spring in the proper hole.
Thread the castle nut onto the buffer tube FIRST, with the larger notches facing toward what will be the receiver end. Then slide on the end plate with its protrusions facing what will become the receiver side.
Begin threading the buffer tube into the receiver. As you turn, be careful not to let the end plate rotate too much or it might dislodge the takedown pin spring.
Thread until the buffer tube almost touches the buffer retainer, then carefully continue turning until it depresses the retainer just enough without binding it. The retainer should still move freely but be held captive by the tube.
Rotate the end plate to align with the receiver. It captures the rear takedown pin spring. Slide the castle nut against the end plate and hand-tighten, then use an AR armorer's wrench for final tightening.
You can "stake" the castle nut later (deforming the end plate into the castle nut's notch) after testing, which prevents loosening.
Front Pivot Pin
This is often considered the trickiest part of the build.
Insert the detent spring into the small hole at the front of the receiver, followed by the detent itself (point facing inward).
Here's the trick: use a utility knife blade to hold the detent flush against the receiver face, then slide the front pivot pin in from the side. Position the pivot pin so its channel will capture the detent as you remove the blade.
Do this over a box or wear eye protection in case the detent launches itself! Many builders have spent time crawling on the floor looking for these tiny parts.
Stock, Buffer Spring, and Buffer
Insert the buffer spring into the buffer tube, followed by the buffer itself (with the smooth end facing out).
Slide your stock onto the buffer tube. Pull the adjustment lever to move past the first detent position if installing an adjustable stock. Set to your preferred position.
AR-15 Lower Receiver Upgrades
Want to take your lower to the next level? Here are some popular upgrades:
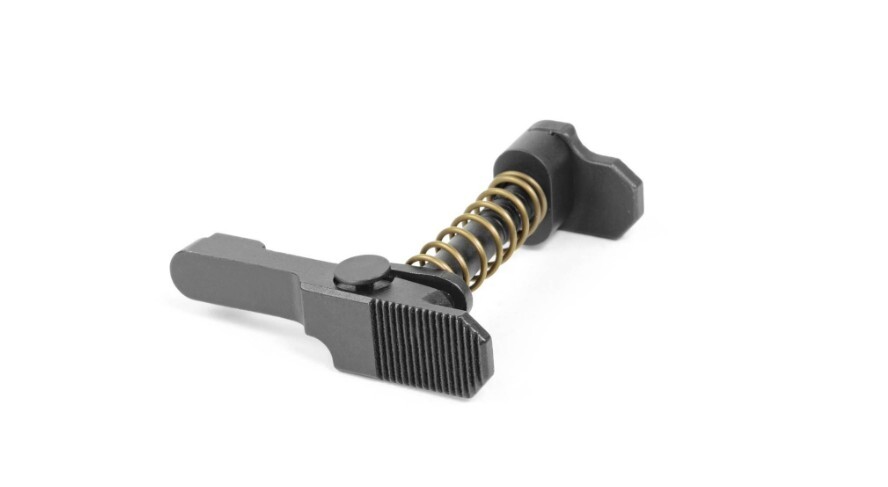
JP Silent Captured Spring
The standard buffer spring creates that distinctive "sproing" noise during cycling. The JP Silent Captured Spring eliminates this with an integrated buffer and spring unit. It smooths out the recoil cycle and reduces felt recoil. This makes follow-up shots easier.
Ambidextrous Safety
An ambi safety lets you manipulate the selector from either side of the receiver. This is especially helpful for left-handed shooters or those using featureless grips in restricted states that don't allow conventional pistol grips.
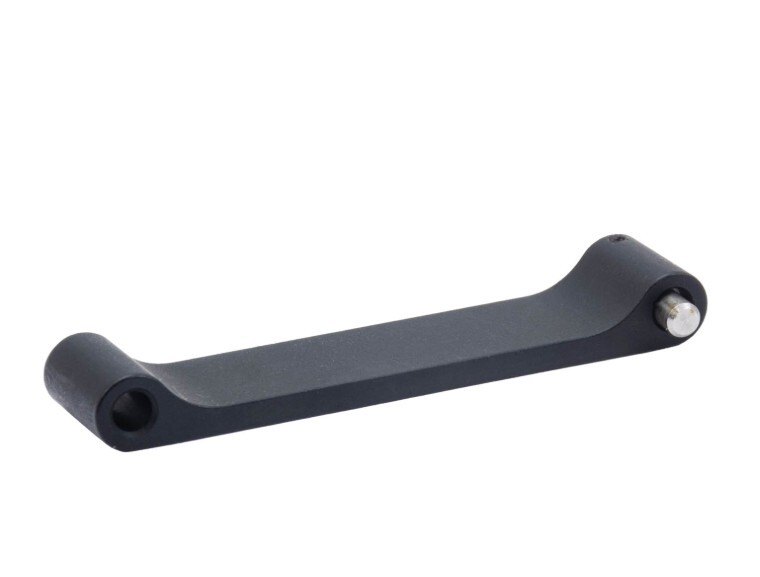
Magpul BAD Lever
The Bolt Assist Device (BAD) Lever attaches to your bolt catch and extends to where your trigger finger rests. This lets you lock or release the bolt without removing your firing hand from position—a huge advantage in competitions or tactical situations.
Match Trigger
A quality match trigger is perhaps the most impactful upgrade. Options like Hiperfire triggers offer crisp, clean breaks with minimal take-up and lighter pull weights. Many feature adjustable pull weights and enhanced hammer strikes for consistent ignition.
Conclusion
Building your own AR-15 lower receiver is a rewarding project that gives you complete control over your firearm's components. With patience and attention to detail, even first-time builders can create a quality lower.
Take your time with those small springs and detents—they're the parts most likely to cause frustration. Use the right tools, protect your receiver's finish, and test function before final assembly steps like staking the castle nut.
Once complete, perform a thorough function check before mating with an upper receiver. Be proud of your build—you now understand your firearm on a deeper level than most owners ever will.
Further reading: pair this lower build guide with our practical AR-15 setup checklist and the build-vs-buy analysis in Buy or Build an AR-15 before you finalize parts and tools.
Frequently Asked Questions (FAQ)
Do I need an FFL to build my own AR-15 lower?
You need to acquire a serialized lower receiver through an FFL transfer, as this part is legally considered the firearm. However, once you legally own the stripped lower, you can purchase all other parts without an FFL and complete the build yourself at home in most states. Always check your local laws first.
What's the most common mistake when building an AR-15 lower?
Launching springs and detents into oblivion! Work over a clean surface or inside a clear plastic bag to catch flying parts. The front pivot pin detent is particularly notorious. Other common mistakes include incorrect trigger spring orientation and improper buffer tube timing that binds the buffer retainer.
Can I mix and match parts from different manufacturers?
Yes, most AR-15 parts are standardized and interchangeable. However, some premium manufacturers use slightly tighter tolerances that may create minor fitting issues. Mil-spec parts generally work together without problems. Just be careful with proprietary parts clearly labeled as such.
What should I do if my trigger feels gritty or heavy?
First, check that the disconnector spring is installed correctly (fat end down). Next, ensure the trigger and hammer pins aren't binding. Light polishing of contact surfaces can help, but don't alter any geometric dimensions. If it's still unsatisfactory, a drop-in trigger upgrade is often the best solution.
How tight should the castle nut be?
The castle nut should be firmly tightened but not over-torqued. Proper torque is about 40 inch-pounds if you have a torque wrench. It should be tight enough that it won't back off during firing, but not so tight that you damage the threads. After testing your build, staking the castle nut provides extra security.
Is it normal for the safety selector to feel stiff at first?
Yes, a new safety selector often feels stiff initially. This will smooth out with use as the parts wear in. If it's excessively tight or doesn't click positively into position, check that the detent and spring are properly installed, and that the grip is fully tightened.
About the Author
This article was written by the ProArmory writing team based on current research, including studies from reputable sources like the Journal of Military Science, Firearms News, and the National Shooting Sports Foundation. We also referenced trusted information from official defense publications and respected firearm authorities such as the ATF, NRA, and manufacturer manuals.
Disclaimer: This guide is provided for educational reading only and does not constitute technical advice or instruction for firearm assembly. Always rely on manufacturer instructions and seek qualified gunsmith assistance when needed.

Best Ammo Deals, Training, & Accessories
Subscribe to ProArmory sales and deals email.


 for Faster Split Times")


 the Future of U.S. Small Arms?")


