


 Pro Armory Editorial Team
Quick Answer
Building an AR upper takes basic tools, attention to detail, and proper torque values. This guide walks you through selecting the right parts, preparing components, and assembling everything from the forward assist to the muzzle device. We cover two complete builds—a lightweight competition setup and a precision SPR—to show different gas block installations, barrel nut timing, and handguard mounting systems.
Key Takeaways
- Match your barrel, gas system, and BCG to your shooting needs.
- Torque the barrel nut correctly (30–80 ft-lbs) with 2–3 seat/loosen cycles before final torque.
- Position the gas block per the manufacturer’s spec (some blocks butt the shoulder; others call for a small gap ~1/32" or a measured setback).
- Use purpose-made tools like receiver blocks to prevent damage.
- Follow proper alignment for gas tubes and muzzle devices.
My friend Matt built his first AR upper with borrowed tools and plenty of YouTube videos. He called me halfway through, frustrated about gas tube alignment. After going back and starting with proper torque cycles and using a .025" feeler gauge for the gas block, he finished in half the time—and his upper ran flawlessly at the range. The right process matters.
AR Upper Basics (What You're Building & Why)
The AR-15 upper receiver houses the bolt carrier group, barrel, and gas system—the parts that handle all the pressure and moving components. According to Wikipedia, the upper receiver contains the bolt carrier assembly and is attached to the barrel assembly. Sights may be attached to the upper receiver or the barrel assembly.
By federal law, the lower receiver is the regulated “firearm” on an AR-15. Uppers are generally not serialized/regulated parts under current ATF guidance.
USA Arms Company explains that the upper receiver on an AR-15 consists of many parts and subgroups of parts or parts assemblies. Those include the barrel, muzzle compensators, muzzle brakes, muzzle flash hiders, bolt carrier group, gas blocks and gas tubes, charging handle, forward assist, handguards, fore grips, ejection port cover, and rails.
Your upper assembly determines:
- Accuracy potential (barrel quality and length)
- Recoil characteristics (gas system, muzzle device)
- Weight (component selection)
- Handling (handguard design, overall balance)
The main components include:
- Upper receiver (stripped or assembled)
- Barrel (various profiles, lengths, and chamberings)
- Gas system (block and tube)
- Handguard/rail system
- Bolt carrier group
- Charging handle
- Muzzle device
Parts Checklist (With Fit Notes)
Upper Receiver
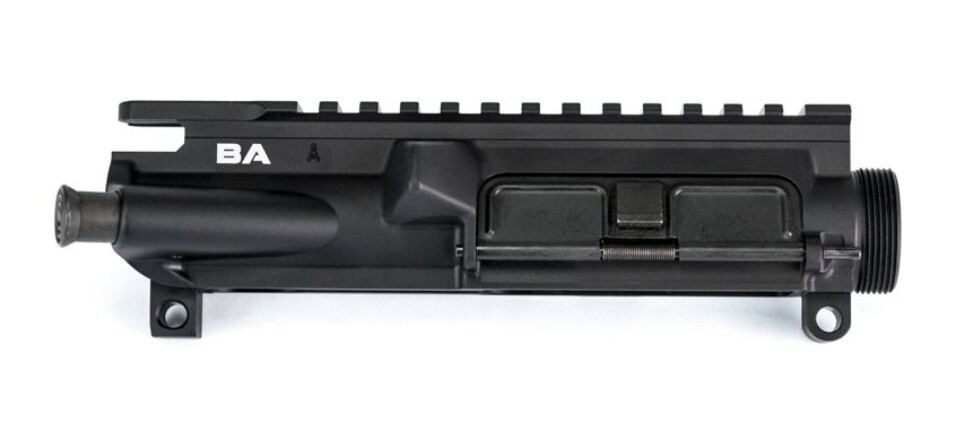
You can buy either stripped or assembled receivers. Stripped receivers need forward assist and ejection port cover installation (we'll cover that). Assembled receivers come with these parts installed and so saving time and usually money.
Look for:
- Forged 7075-T6 aluminum for strength
- M4 feed ramps (improved feeding)
- Proper machining with no burrs
- Price range: $80-150
Barrel
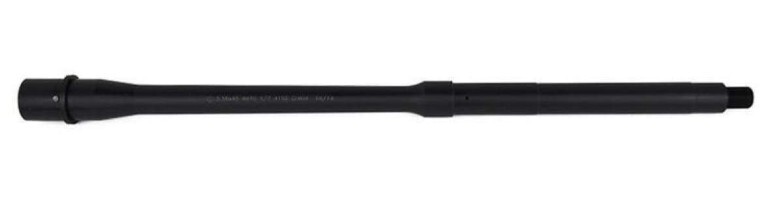
The barrel determines accuracy, weight, and handling. Key specifications include:
- Length: 16" is standard (shorter barrels require NFA paperwork)
- Profile: Lightweight, government, SOCOM, bull (heavier = more accuracy but more weight)
- Chambering: .223 Wylde (accuracy) or 5.56 NATO (versatility)
- Gas system length: Carbine, mid-length, or rifle (longer = smoother recoil)
- Twist rate: 1:7 or 1:8 for most modern ammo
Price range: $150-400 depending on quality and features
Gas System
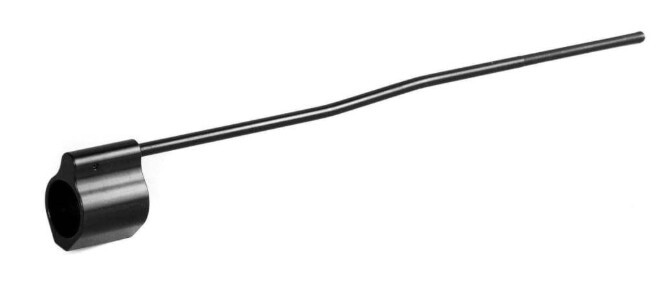
The gas system includes:
- Gas block: Choose between clamp-on (no barrel modification) or set-screw (requires dimpled barrel)
- Adjustable vs. fixed: Adjustable allows tuning for suppressors or light loads
- Gas tube length: Must match barrel gas port (carbine, mid, intermediate, rifle)
- Proper alignment: Follow the gas-block maker’s spec (shoulder-butted vs. small gap as specified).
Price range: $30-100 for gas blocks, $10-20 for tubes
Handguard
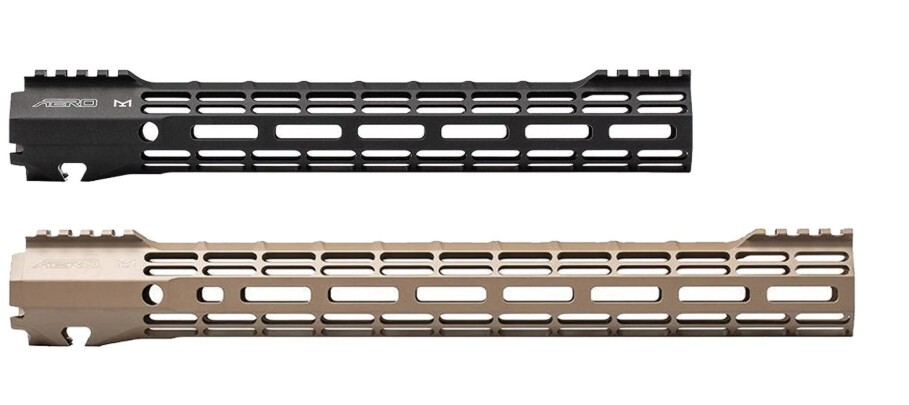
Modern handguards use M-LOK or KeyMod attachment systems and free-float designs for accuracy. Consider:
- Length: Longer provides more real estate for accessories
- Mounting system: Different barrel nut designs and installation methods
- Weight: Aluminum vs. carbon fiber options
- Clearance: Must fit over your gas block
Price range: $120-300
Muzzle Device
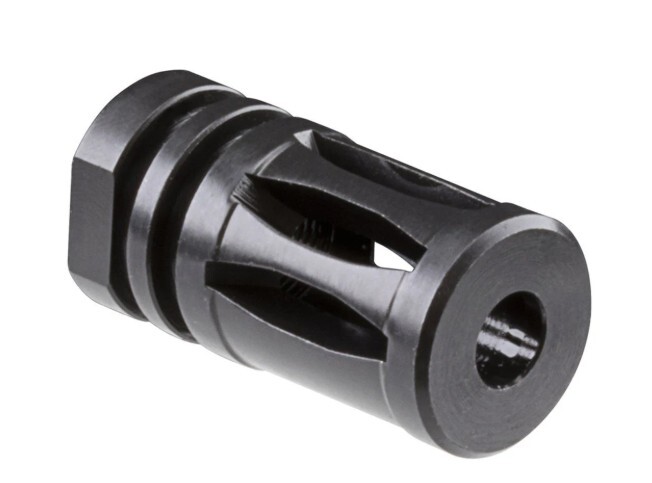
Options include:
- Flash hider: Reduces visible signature
- Compensator: Reduces muzzle rise
- Brake: Reduces felt recoil
- Combination devices
Price range: $20-200
BCG & Charging Handle
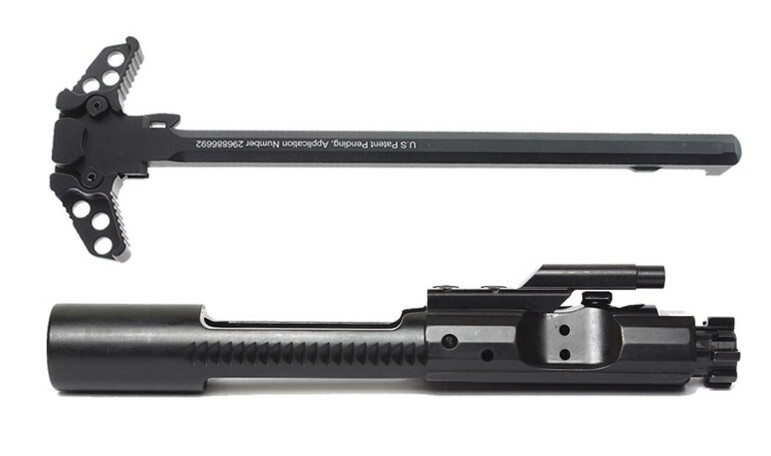
The bolt carrier group and charging handle complete your upper:
- Full-auto profile BCG (standard, works in all rifles)
- Lightweight BCGs for competition
- Extended charging handles for easier manipulation
Price range: $100-400 for BCGs, $20-100 for charging handles
Tools & Supplies (Minimum vs Nice-to-Have)
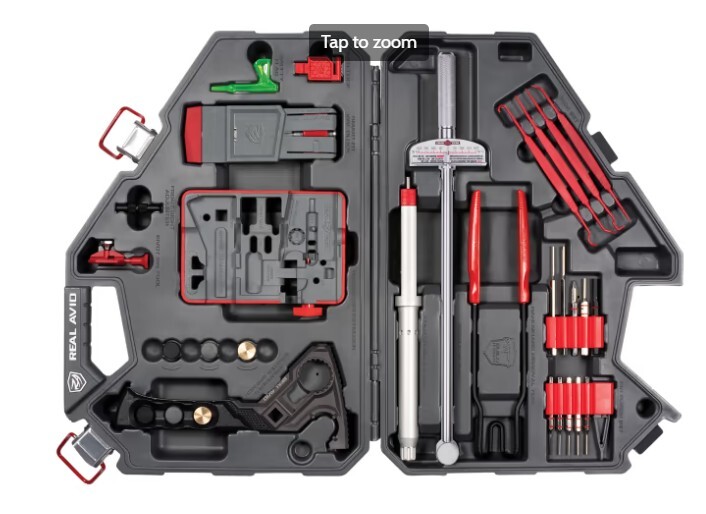
Essential Tools
- Upper receiver block/vice block ($40)
- Bench vise ($30+)
- Torque wrench (1/2" drive, 10-80 ft-lb range) ($25+)
- Punch set (brass preferred) ($15)
- Non-marring hammer ($10)
- Feeler gauge of the specified thickness (avoid ad-hoc substitutes like business cards; thickness varies).
Nice-to-Have Tools
- AR-15 combo tool ($20)
- Inch-pound torque wrench for gas blocks ($50)
- Headspace gauges ($30+)
- Barrel nut alignment tool
Supplies
- Aeroshell grease or equivalent for barrel nut threads
- Gun oil for small parts
- Blue Loctite (where specified by manufacturers)
- Cleaning patches and solvent
- Crush washer or shims for muzzle device
Total investment: $150-300 for a complete tool setup
Pre-Build Checks (Save Time & Rework)
Before you start turning wrenches, take these steps to prevent headaches:
- Inspect all parts for damage, burrs, or defects
- Test-fit the barrel extension into the upper receiver—it should slide in smoothly with the index pin aligned to the receiver notch
- Check handguard clearance over your gas block—some low-profile blocks are still too tall for certain handguards
- Verify your barrel nut doesn't need timing—some designs require gas tube alignment which might need barrel nut spacers
- Confirm you have all needed parts and tools before starting
- Create a clean, well-lit workspace with room to organize small parts
- Have reference materials (like this guide) printed or readily accessible
Taking these steps now saves frustration later when you're halfway through assembly.
Step-by-Step Build
Installing Forward Assist & Ejection Port Cover (For Stripped Receivers)
If you bought an assembled receiver, skip to the barrel installation. For stripped receivers:
1. Forward Assist Installation
- Place the upper in a receiver block in your vise
- Orient the forward assist so the "tooth" faces inward toward the receiver
- Start the roll pin with a punch
- Press the forward assist in against spring tension as you drive the pin
- Tap gently until the pin is flush with the receiver
2. Ejection Port Cover Installation
- Check that the hinge pin has a C-clip installed on one end
- Position the cover in the receiver with the spring
- Twist the spring 180° to create tension
- Hold it in place as you slide the hinge pin through
- The cover should snap closed when released
Barrel & Barrel Nut Installation
3. Installing the Barrel
- Apply a light coat of oil to the barrel extension
- Align the index pin with the notch in the receiver
- Push the barrel firmly into place—it should seat fully
4. Barrel Nut Installation
- Apply grease to the upper receiver threads
- Thread the barrel nut onto the receiver hand-tight
- Using a torque wrench, tighten to ~30 ft-lbs, loosen; repeat 2–3 times, then finalize between 30–80 ft-lbs (or handguard maker’s spec).
- Loosen completely
- Repeat this process 2-3 times to ensure proper seating of the surfaces
- Final torque should be between 30-80 ft-lbs (follow manufacturer specs)
5. Gas Tube Alignment (If Needed)
- Some barrel nuts require proper alignment for the gas tube
- The gas tube must pass freely through one of the openings
- If proper alignment isn’t achievable within torque specs, use timing shims provided/approved by the handguard manufacturer.
Gas System Assembly
6. Gas Tube to Gas Block
- Orient the gas tube so the gas port hole aligns with the block’s port and roll-pin holes; the tube’s bend/hump faces up toward the carrier key (per the block/tube maker’s instructions).
- Align the small hole in the tube with the roll pin holes in the gas block
- Start the roll pin (crimp one end slightly with pliers to help)
- Support the assembly and tap the pin until flush
7. Gas Block Installation
- Slide the assembled gas block and tube over the barrel
- Position the gas block exactly .025" back from the shoulder (use a feeler gauge)
- Align the gas port by centering the gas block with any barrel markings
- For set-screw gas blocks: tighten to the maker’s spec (commonly ~30–40 in-lbs with threadlocker).
- For clamp-on blocks: tighten screws evenly
Handguard Installation
8. Handguard Mounting
- Follow the specific instructions for your handguard model
- Most modern handguards include their own barrel nut and mounting hardware
- Ensure anti-rotation features are properly aligned
- Tighten all screws to manufacturer specifications
- Check for proper alignment and that the handguard doesn't rotate
9. Muzzle Device Installation
- If using a crush washer, install with the cupped/conical face toward the muzzle device (flat face to the shoulder), then time to spec.
- Thread on the muzzle device hand-tight
- Time the device by rotating it until properly oriented (ports up for compensators)
- Tighten using the *wrench flats* on the device to the maker’s torque spec; don’t lever through ports, which can damage the brake/flash hider.
- Ensure proper timing with crush washer fully compressed
Final Assembly
10. BCG & Charging Handle
- Lubricate the charging handle and BCG contact surfaces
- Insert the charging handle first, then the BCG
- Function check the assembly by pulling the charging handle
- Verify the ejection port cover and forward assist work properly
Function and Safety Checks
11. Pre-Range Checks
- Visually inspect the gas tube alignment through the carrier key path
- Check that all fasteners are tight
- Verify the gas block is properly aligned over the gas port
- Check headspace if you have gauges
- Hand-cycle the action to check for binding or issues
Complete Build #1 — Lightweight Competition Upper
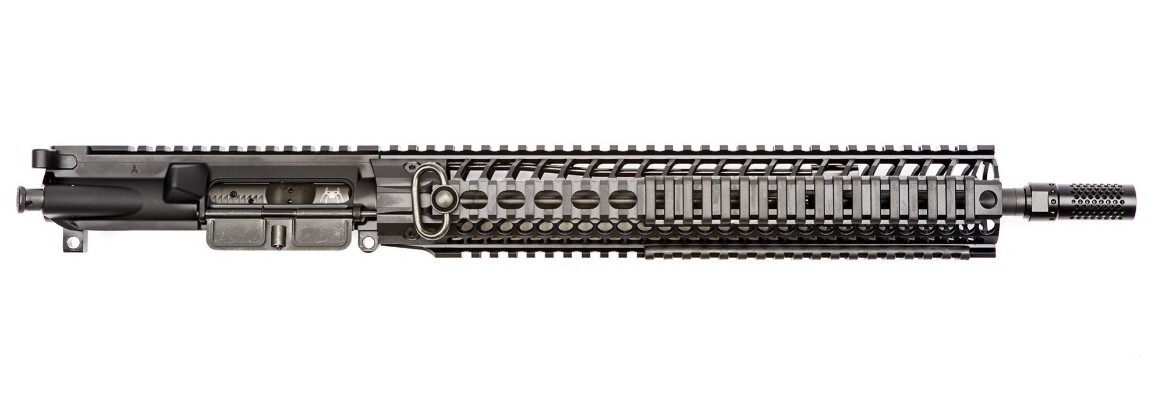
For this build, we're focusing on creating a light, fast-handling upper with minimal recoil for competition shooting.
Parts List:
- Upper Receiver: Aero Precision Stripped Upper ($80)
- Barrel: 16" Lightweight Profile, Mid-length Gas, .223 Wylde ($150-250)
- Handguard: 12" M-LOK Free-float ($150-180)
- Gas Block: Adjustable Clamp-on .625" ($60-100)
- BCG: Lightweight ($200-360)
- Charging Handle: Extended Latch ($40-60)
- Muzzle Device: Competition Compensator ($40-60)
- Gas Tube: Mid-length ($15)
Assembly Notes:
For this competition build, the key factors include:
- The lightweight profile barrel saves weight without sacrificing accuracy
- Mid-length gas system creates a smoother recoil impulse
- .223 Wylde chamber provides match accuracy with 5.56 flexibility
- Adjustable gas block allows tuning for minimal recoil
- Lightweight BCG reduces reciprocating mass for faster follow-up shots
This type of build typically weighs 1-1.5 lbs less than a standard AR upper, which makes a huge difference in handling during dynamic stages.
Complete Build #2 — SPR/Precision Upper

This Special Purpose Rifle (SPR) build focuses on accuracy and consistency for precision shooting.
Parts List:
- Upper Receiver: Assembled Upper ($100)
- Barrel: 18" SPR Profile, Intermediate (a length between mid and rifle, used on some 18" barrels) or rifle-length gas, .223 Wylde ($250-400)
- Handguard: 15" Free-float Rail ($180-250)
- Gas Block: Set-screw Low-profile ($40-60)
- BCG: Full-mass, Match-grade ($150-200)
- Charging Handle: Standard or Ambidextrous ($40-80)
- Muzzle Device: Precision Brake or Compensator ($50-120)
- Gas Tube: Intermediate or Rifle-length ($15)
Assembly Notes:
The precision-focused build differs in several key ways:
- Longer, heavier barrel increases velocity and stability
- Longer gas system creates a smoother recoil impulse
- Set-screw gas block on a dimpled barrel offers secure alignment
- Full-mass BCG provides consistent lockup and extraction
- Longer handguard supports bipods or other stabilizing accessories
This type of build typically weighs 1-2 lbs more than a standard AR upper but delivers enhanced long-range precision.
AR Upper Builds Comparison
| Aspect | Lightweight Competition Upper | SPR / Precision Upper |
|---|---|---|
| Barrel (length / profile / chamber) | 16" — Lightweight profile; mid-length gas; .223 Wylde | 18" — SPR profile; intermediate or rifle-length gas; .223 Wylde |
| Gas block | Adjustable clamp-on (.625") | Set-screw low-profile (installed on dimpled barrel) |
| Gas tube length | Mid-length | Intermediate or rifle-length (depending on exact build) |
| Handguard | 12" free-float M-LOK | 15" free-float full-length rail |
| Bolt Carrier Group (BCG) | Lightweight BCG (reduced mass for faster cycles) | Full-mass, match-grade BCG for consistency |
| Charging handle | Extended latch for rapid manipulation | Standard or ambidextrous, depending on shooter preference |
| Muzzle device | Competition compensator to reduce perceived recoil and rise | Precision brake or compensator tuned for minimal disturbance |
| Upper receiver | Aero Precision stripped upper (lightweight focus) | Assembled precision upper (match components) |
| Primary goal | Light, fast handling with minimal recoil for competition work | Accuracy and consistency for precision shooting and longer-range engagements |
| Typical weight vs standard | About 1–1.5 lb less than a standard AR upper | About 1–2 lb more than a standard AR upper |
Tuning & Initial Range Procedure
Once your upper is assembled, follow these steps for initial testing:
- If using an adjustable gas block:
- Start with the gas nearly closed
- Load a single round and fire
- If the bolt doesn't lock back, open the gas slightly
- Repeat until you achieve reliable function
- Add 1/4 turn for reliability margin
- Initial function testing:
- Test with various ammunition types
- Check ejection pattern (4-5 o'clock is ideal)
- Verify the bolt locks back on empty magazines
- Check for any unusual gas or debris
- After first range session:
- Re-check all fasteners for tightness
- Clean the BCG and chamber
- Inspect gas block alignment
Troubleshooting (Quick Diagnostics)
Short-stroking (bolt doesn't cycle fully)
- Gas block may be misaligned with gas port
- Gas setting too low on adjustable blocks
- Carbon buildup in gas tube or block
- Weak buffer spring
Failure to extract/eject
- Extractor spring may need replacement
- Chamber may need cleaning
- Gas system issues (see above)
Accuracy problems
- Check barrel nut torque
- Verify handguard isn't contacting barrel
- Inspect muzzle device timing and tightness
Re-verify gas block alignment
Unusual wear patterns
- Check proper lubrication
- Verify BCG and upper receiver match quality
- Look for burrs or machining defects
Care & Maintenance
Keep your AR upper running smoothly with these maintenance tips:
- Regular cleaning:
- Clean the chamber and bore after shooting
- Remove carbon buildup from the BCG
- Check gas ports for obstructions
- Lubrication points:
- BCG rails and cam pin
- Charging handle latch and spring
- Barrel extension
- Periodic checks:
- Re-verify torque on all fasteners after 500 rounds
- Inspect gas block alignment
- Check handguard mounting screws
- Long-term storage:
- Light coat of oil on all metal surfaces
- Store in a cool, dry place
- Consider vacuum-sealed storage bag

Magtech 5.56 NATO 62gr FMJ
$26.54
at Pro Armory
Prices accurate at time of writing
Recommended Parts by Use-Case
For Home Defense
- 16" barrel with mid-length gas
- Standard BCG for maximum function
- Flash hider to preserve night vision
- Simple, robust handguard
For Long Range
- 18-20" barrel with rifle-length gas
- Heavy or match-grade barrel
- Full-mass BCG
- Precision muzzle brake
For 3-Gun Competition
- 16" lightweight barrel
- Compensator for reduced muzzle rise
- Lightweight BCG
- Adjustable gas block
Budget-Friendly
Focus spending on barrel and BCG quality
Standard gas block and tube
Basic handguard with room to upgrade later
Conclusion
Building your own AR-15 upper receiver lets you create exactly what you need for your shooting style. The process isn't complicated with proper tools and patience. Take your time, follow torque specifications, and pay special attention to the gas system alignment.
Remember that the upper receiver assembly handles all the pressure and moving parts in your AR-15. A properly built upper provides years of accurate, trouble-free shooting. And there's nothing quite like the satisfaction of building it yourself.
I am sure that this guide should help you create a quality upper that meets your needs. Good luck with your build!
Trying to choose? If you value customization and learning, build the upper yourself. If you want guaranteed fitment and time savings, a prebuilt upper may be better. Our decision guide lays out both options: Buy or Build AR-15.
Frequently Asked Question (FAQs)
Do I need a headspace gauge if I buy quality parts?
Quality barrels and BCGs typically headspace correctly, but verify with GO/NO-GO gauges before live fire. However, a GO/NO-GO gauge provides peace of mind for about $60. It's cheap insurance against potentially dangerous conditions.
What's the proper torque for my barrel nut?
Most barrel nuts should be torqued between 30-80 ft-lbs. Your handguard manufacturer will specify the exact value. Always perform 2-3 torque cycles to properly seat the surfaces.
Clamp-on or set-screw gas blocks—which is better?
Set-screw blocks require a dimpled barrel but provide excellent alignment. Clamp-on blocks work on any barrel without modification but may need more careful alignment. Both work well when properly installed.
Do I need an adjustable gas block?
For standard setups, a fixed block works fine. Adjustable blocks shine with suppressors, lightweight BCGs, or when tuning for competition. They add complexity but offer performance benefits.
How do I time my muzzle device correctly?
Use a crush washer or shim kit to achieve proper timing. For compensators, ports should face upward. For flash hiders, ports should avoid the 6 o'clock position to reduce dust signature.
Can I build an upper without a receiver block?
Not recommended. The receiver block prevents damage and ensures proper alignment. It's a one-time purchase that protects your investment in parts.
About the Author
This article was written by the ProArmory writing team based on current research, including studies from reputable sources like the *Journal of Military Science*, *Firearms News*, and the *National Shooting Sports Foundation*. We also referenced trusted information from official defense publications and respected firearm authorities such as the ATF, NRA, and manufacturer manuals.
Disclaimer: The information provided in this article is for educational purposes only. Building firearms components requires proper tools, knowledge, and adherence to all federal, state, and local laws. ProArmory assumes no liability for improper use of this information.

Best Ammo Deals, Training, & Accessories
Subscribe to ProArmory sales and deals email.


")
")


 for Faster Split Times")


